
Unlike digital audio, which is basically plug, play, and pray your Wi-Fi doesn’t crap out mid-stream, vinyl playback is a different beast entirely. You don’t just drop a needle and expect magic. That magic depends—often frustratingly—on how well your phono cartridge is set up. And if this is your first turntable, there’s a decent chance it’s not quite right.
We’ve spent the last decade romanticizing vinyl to a whole new generation—“warmth,” “ritual,” “tactile experience,” blah blah blah—but now that the needle’s on the record, the honeymoon’s over. Our inbox is overflowing with complaints: muddy sound, distortion, bass that disappears faster than a bartender at last call.
Here’s the hard truth: it’s probably not your amp, or your speakers, or the pressing. It’s your cartridge setup. Azimuth, VTA, tracking force, alignment—it all matters. Nail it, and vinyl delivers that full-bodied, three-dimensional sound we all rave about. Get it wrong, and you’re left wondering why your $35 reissue sounds like a wet sock being dragged across sandpaper.
So yeah, digital is easier. But if you’re in this for the long haul, it’s time to learn how to make your analog front-end work the way it should.
We’ve devoted a lot of space to audiophile turntables, phono pre-amplifiers, and all of the accessories you might need to maximize your experience but not enough attention has been paid to phono cartridge setup.

Setting up your phono cartridge properly isn’t just some audiophile ritual—it’s essential. Get it wrong, and you’re not only killing the sound, you’re also shaving years off the life of your stylus and damaging your records in the process. And that’s not hyperbole—that’s just physics and friction working against you.
That last part? Even more important than you think. Because while you’re basking in the romance of crate-digging for that “vintage” Miles Davis LP at a garage sale or local shop, what you’re really buying is a time capsule full of gunk: dust, smoke, hair (both pet and human), and other mystery fluids best left unnamed. Every one of those particles acts like sandpaper when your stylus hits the groove.
And don’t even get me started on the scratches and edge dings. If you’re dropping a $500 cartridge onto a $3 copy of Rumours that smells like an ashtray and hasn’t seen a record brush since the Carter administration, you’re not preserving history—you’re destroying both your gear and the music.
Clean your records. Set up your cartridge right. And treat your analog rig like the precision tool it is—not a thrift store toy.
Why Cleaning Your Records (Even the New Ones) and Proper Cartridge Setup Actually Matter
You’d think a “brand new” record would be clean straight out of the sleeve. Spoiler: it’s not. Pressing plants aren’t sterile environments. Between the leftover compounds from the pressing process and whatever dust settles during packaging, your shiny new LP is already wearing a light coat of sonic sabotage. So yes—clean your records. All of them.
Now, about that turntable you just unboxed with the pre-installed cartridge. Manufacturers say it’s “factory aligned,” but that’s not a free pass to skip setup. Tracking force, anti-skate, and counterweight still need your attention. Skipping this step is like driving off the lot without adjusting the mirrors—dangerous and dumb.
Follow the manual. Read articles like this. Save yourself the frustration and preserve your stylus in the process.
And if you’re thinking of upgrading your cartridge later, don’t just buy the shiniest thing in the catalog. Not every cartridge plays nice with every tonearm. Compatibility matters, and your ears (and wallet) will thank you for doing a little homework first.
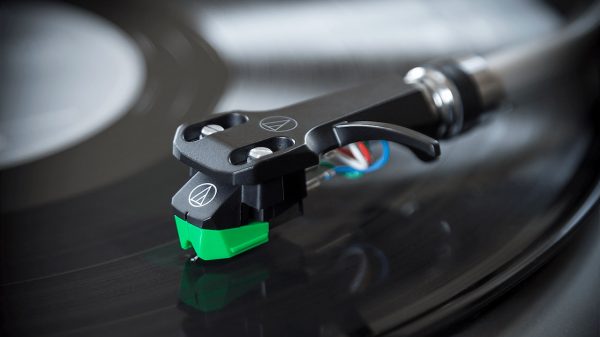
Choose the right tonearm: Select a tonearm that is compatible with the cartridge you have chosen, and has the right effective mass, compliance, and overhang to work optimally with your cartridge.
Mount the cartridge: Follow the manufacturer’s instructions for mounting the cartridge to the tonearm. Ensure that the cartridge is mounted securely and aligned properly, with the correct azimuth, overhang, and vertical tracking angle.
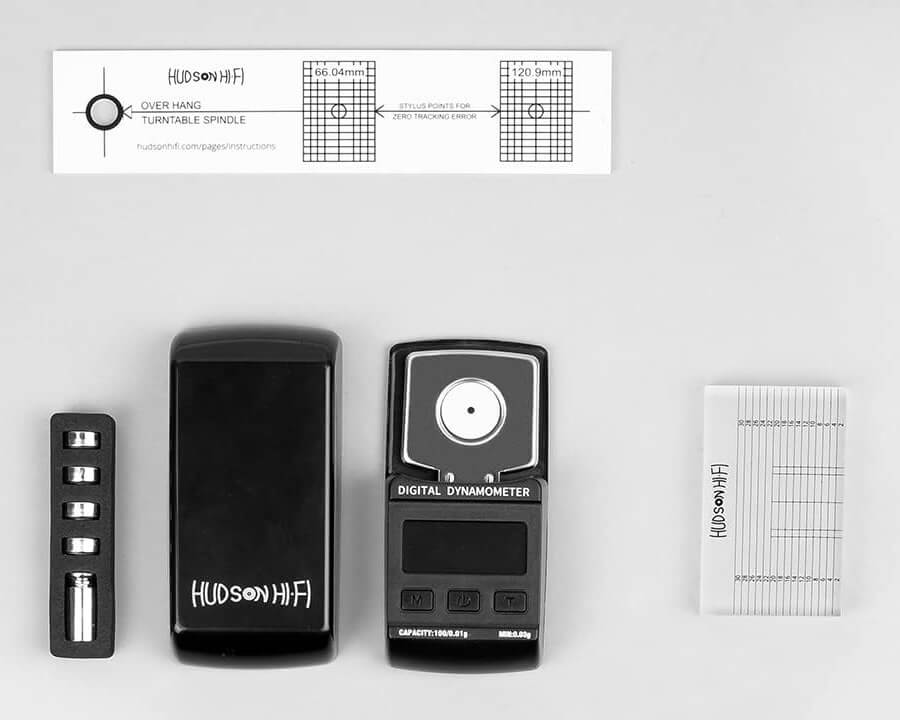
Balance the tonearm: The tonearm must be balanced so that it remains level when tracking a record. This involves adjusting the counterweight until the tonearm floats freely with the cartridge in place.
Choose the right stylus force: The correct stylus force will depend on the cartridge you have, but typically, it’s between 1.5 and 2.5 grams. Check the manufacturer’s specifications for the recommended force and use a stylus force gauge to set it accurately.
Align the cartridge: Aligning the cartridge correctly is important for optimal sound quality and to prevent damage to your records. This includes ensuring that the cartridge is parallel to the record, and the stylus is centered over the groove. There are several popular alignment protractors available to help you with this step.

Adjust anti-skating: Anti-skating helps prevent the stylus from skating towards the center of the record, causing unequal wear on the record and affecting sound quality. The anti-skating force should be set to the same value as the tracking force.
Connect to the preamp: Finally, connect the cartridge to a phono preamp, which amplifies the cartridge’s low-level output signal to line-level.
Calibrate the phono stage: Adjust the phono preamp’s gain, impedance, and capacitance to match your cartridge’s specifications.
Check the stylus condition: Regularly inspect the stylus for signs of wear and replace it as needed. A worn stylus can cause damage to your records and degrade the sound quality.

The Bottom Line
It doesn’t matter if you are a casual listener or deeply invested in your record collection — proper phono cartridge set-up is critical to enjoying the vinyl listening experience.
And it doesn’t matter if you are using an entry-level turntable or a state-of-the-art turntable like the $18,000 Kuzma Stabi R with a $5,000 Hana MC — the same setup issues apply to the tonearm and cartridge.
The best turntables in the world can sound amazingly average if the cartridge is not properly installed.
Related Reading:
- The 3 Best Affordable Record Cleaning Solutions Every Vinyl Lover Should Own
- Should You Buy a Vintage Turntable? Five of the Best Worth Considering Today
- Best Phono Cartridges: Editors’ Choice


")


Mike Cornell
September 28, 2023 at 1:04 pm
Hi Ian….a couple of nit piks: I would think you should balance the tonearm before setting the stylus pressure as opposed to the order suggested in the article 😀. Also, as most turntables, especially those bought by folks new to the vinyl experience come with tonearms and tonearms are not easily (if that’s even possible) changed, one should choose the right cartridge for the tonearm, not the other way around. Good points all around though about the importance of setting things up properly to get the best vinyl experience! Cheers!
Ian White
September 28, 2023 at 1:21 pm
Mike,
Good catch on #1. It was actually an editing error on my part. I didn’t move the paragraph up as it was supposed to be.
As far for #2, manufacturers have actually started to listen and now offer tonearms on even entry-level decks that can be adjusted. Are you getting everything? Not really, but I think most of the entry-level decks use either Audio-Technica or Ortofon (hate the 2M Red) cartridges that were selected specifically for that arm.
I don’t think consumers buying $300 turntables should necessarily drop $500 on a cartridge upgrade (nor do I think most would ever do it) but I do believe that spending a little more on a better cart, phono stage, and spending the time on proper set-up goes a long way long-term.
Best,
Ian White
Mike Cornell
September 28, 2023 at 7:04 pm
To clarify re:#2….it seemed to imply that you should choose your tonearm so that it would be compatible with your cartridge and I was saying that, as most turntables alsteady come with tonearms, it makes more sense to choose a cartridge that is compatible with the tonearm you already have. Adjustability can only go so far if your cartridge is too compliant for your tonearm or too light/heavy with respect to the supplied counterweight. Anyway, all good points; keep up the great work, Ian!
ORT
September 29, 2023 at 10:39 am
One of my ‘tables is a fully frAutomatic Direct Drive Technics with a *GASP* P Mount cartridge.
It’s looks are mild but I like them better than that “thing” Bro-Ject put on my Essential III Sgt. Poopers 50th setup. The OM10, well…the entire “series” of OM are F U G L Y.
The OM looks like a fishing lure for catching stoopid fish. If I had now how I would despise it (I have not used the table in nearly a year now after replacing the belt as I cannot look at that “thing” on the bidness end of the arm of tone.
I would rather have a P Mount than any OM.
I have not slept in a couple of days now. Yeah…I am grumpy but truth be told the OM deserves derision. The P Mount is nice enough but as I maintain that the majority of frAudiophiles love to self-flagellate and cartridges are but one way of accomplishing their mission. In general they are lost when it comes to beauty in audio equipment.
Don’t beweive me? Just look at some of their 300lb turntables that look like Robby the Robot humped an off brand Chicom robot vac and forgot to wear his resistor. Contrast that poop with Data from Star Trek TNG hooking up with “Honey West”. No offspring but you can bet they listened to vinyl on a Pro-Ject X2 in walnut…CLASS.
ORT
Andy C
July 18, 2025 at 8:11 pm
Rega 3 point mount does a lot of heavy lifting ( if you have a Rega). Elys wasn’t brilliant. Exact was good but felt a bit pricey. I’m so glad Rega launched the ND range. The ND3 is better than the Exact ( in my opinion). The ND5 which is the Exact replacement price wise is light years better. ND7 is best MM I’ve ever heard at the price and probably twice the price.
Ian White
July 18, 2025 at 8:53 pm
Andy,
I agree. The new Rega carts are very, very good. And underrated.
IW
T Scott
September 29, 2025 at 11:44 pm
Sorry, I just now read your article. I enjoy reading positive reviews of the Yamaha YP-701 since it reinforces just how smart I was when I bought mine in 1976 when I purchased it at Houston’s premier audio store. They had much more expensive machines, but the sales guys agreed that I would have to pay vastly more to get anything better. Since then, I’ve replaced multiple belts and a couple of cartridges, and occasionally put the drop of oil where recommended. The result is it still works perfectly after almost 50 years.
There is an easy way to replace the belt that was shown in the original assembly instructions. Remove the motor drive cover by pulling it straight up, hook the old belt with a finger and pull it off the platter, work it around the speed change pawl and off the motor drive spindle. Remove the platter by lifting it by its edges while pushing down on the spindle. It may stick a little. At this point, I wear gloves to avoid passing skin oils to the belt, platter or motor spindle. Once the platter is off, wipe its edge where, it contacts the belt, and the motor spindle with rubbing alcohol and let them thoroughly dry. Cut a short piece of ribbon or string (4″-6″) and place one end through the new belt, then place the new belt on the platter where it will ride. The ribbon or string should be trapped between the platter and belt with the two ends hanging out. Place the platter back on the spindle and rotate it so that the ribbon is closest to the motor drive spindle. Grab the ends of the ribbon and pull the belt away from the platter enough to position it in the speed change pawl, then over the motor drive spindle. Remove the ribbon and turn the platter a couple of revolutions by hand to be sure the belt is riding properly. Replace the motor cover and platter mat. You are good to go. I replace the belt whenever I can stall the platter by pushing against a record with my Discwasher using light to moderate force.
One other thing. The motor and platter suspensions springs include open cell foam inserts. The only function I can imagine for the foam is to kill any harmonics that may be generated or passed through the springs. My foams were discolored and compressed, so it was time to change them. My assumption is that there is a certain amount of latitude in the foam’s compliance, so I found foam hair rollers having the same diameter, and compliance that was close to the original foam pads. I cut new pads from the rollers of the same thickness and replaced the old. I’ve heard no problems that I can attribute to my new pads.