Baby’s first steps, the first day of school, or a 50th wedding anniversary — you’ve probably captured many memories with your camcorder. What will you do with all that footage? Will you play it back on your TV? Will you make copies to share with friends and family? Will you edit your files and archive them to enjoy for years to come? Below, we’ll look at what you can do with your camcorder footage, and offer our suggestions and tips for getting the best results with your home movies.
Playing your videos on a TV
Reviewing your footage on a TV is simple enough — connect the camcorder to your TV with the audio/video cables that come in the box. However, these cables probably won’t give you the best-quality connection, so you may want to invest in higher-quality cables. Check out our article on choosing audio and video cables to learn more.
Using the best output on your camcorder will give you crisper, cleaner playback.
Selecting the right cables is even more important if you own a high-definition camcorder and an HDTV. In order to view the video you recorded in full high-def resolution, you’ll want to use a component video or HDMI cable. Many of these camcorders come with a component video cable in the box, and also have a mini- or full-sized HDMI output for use with an optional cable. Using a compatible HDMI cable can give you a convenient single-cable connection to your TV, since it can pass both video and audio signals. (See specific camcorder models for more information about video output options — some cams feature proprietary outputs and will require a specialized video cable.)
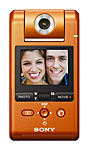
Sony’s small MHS-PM1
Webbie HD™ camcorder
records web and e-mail
friendly videos in high-def.
16GB
Store videos on iPods and
MP3 players for on-the-go
sharing. (Apple iPod® nano
New ways to share and enjoy your videos
With recent technology advances, it’s become easier than ever to copy and share footage for all to see. Here are a few new ways to share your home movies:
- Post your videos on a website. Video-sharing sites like YouTube™ and video blogs make it easy to post footage that your friends and family can view. Post clips of baby’s first steps, your child’s birthday, or that crazy family reunion you went to last year. You can use special software to compress your recordings for posting on these sites, or invest in a web-friendly cam that produces videos that are easy to upload to sites or e-mail directly to family.
- Store footage on an iPod® or MP3 player. Transfer video clips to your portable player and show them off to family members next time you get together at the holidays. Putting videos on a portable player may also require special software that converts your videos to a compatible format. Some players can be connected to a TV for large-scale playback of your videos.
- Use the SD card slot or USB port on your HDTV. Some newer HDTVs offer built-in SD memory card slots and USB ports. That means that if you have an SD memory card camcorder, you can copy footage onto the SD card and pop it into the card slot on a compatible HDTV. And of course you can connect just about any camcorder with a USB port up to a compatible HDTV. Just be sure to check your television’s manual to be sure that it’ll play back video, and that it’s compatible with your camcorder’s video recording format.
Copying and archiving your footage for yourself and others
You can use a number of different devices to make copies of your footage — from DVD recorders to your computer (if it has a DVD burner). Using a component-style DVD recorder, you simply connect the camcorder via its audio/video outputs. Then you can make standard-definition copies of your discs, tapes, or hard drive video footage.
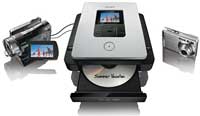
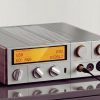
DVD recorders like the
Sony VRD-MC5 allow you
to back up home movies
without using a PC.
DVD recorders for camcorders are relatively new to the camcorder accessory market. These recorders are designed specifically to help people archive their camcorder footage. They’re especially handy for folks who have a hard drive camcorder but don’t have a computer with a DVD burner. You’ll probably use the USB output on your camcorder to make a digital connection to these DVD recorders. Then, you can record your footage on full-size DVD discs for playback in most newer DVD players.
Some DVD recorders may only offer standard-definition recording. Others will allow you to copy standard- and high-definition video footage — a big plus for HD camcorder owners. You’ll be able to downconvert your high-definition (HD) videos for playback on most DVD players, or maintain the high resolution of HD video files for playback on the recorder itself or a compatible Blu-ray Disc™ player.
Another archival option: use your PC and an external hard drive or online storage site
If you have a PC, you can attach an external hard drive to your computer and simply copy footage from your tapes and discs onto the hard drive. Hard drives have become much more affordable in the past year, so they’re a great way to store videos, photos, and music. Saving files onto an additional hard drive lets you keep your computer’s hard drive free for everyday needs. Finally, if you fill up an external hard drive with your home movies, you can unplug it and keep it somewhere safe, and connect a new one for your next batch of archives.
Online storage sites provide a great secondary backup in case of a house fire, theft, or other disaster that may cause damage to your tapes, discs, or PC. They let you store your files on a secure, remote server via an Internet connection, usually for a small monthly maintenance fee. When looking for a site, be sure to find a reputable name since they tend to have the best quality facilities for their servers. Be aware of any storage limitations the company has, and of what security measures they take to keep your data safe. It’s also a good idea to read some customer reviews, if you can.
The importance of backing up your footage
It’s unfortunate, but discs and tapes can break, wear out, or get lost, and hard drives fail eventually. So we recommend that you make multiple copies of your videos. Backing up your home movies on additional discs and to an external hard drive is a great way to ensure your memories will survive for years to come. We recommend against using your computer’s hard drive to store everything long-term. Uncompressed digital video takes up a lot of space, and your computer’s main hard drive is more susceptible to eventual failure. An external hard drive will allow you to store your videos without taking up unnecessary space on your PC. That way, if you lose a tape or DVD, or if your computer’s hard drive crashes, you’ll still have perfect copies of your son’s first steps, your best friend’s wedding, and other irreplaceable footage.
Connecting your camcorder to a computer
Mini DV and Digital8® camcorder owners will need an i.LINK® (IEEE 1394) jack to transfer digital video from their cam to their computer. If you have a newer computer without an i.LINK jack, it should be fairly easy and inexpensive to add one via an optional PCI or PC card.
Mini DVD, hard drive, and flash memory camcorders can transfer video files and photos onto your computer via a USB interface. Most newer computers come with a USB port; if yours doesn’t have one, you can add a USB port through a PCI or PC card. It’s worth noting that there are two different types of USB ports — full-speed USB and high-speed USB — and many camcorders are able to transfer video to your computer with either type of port. However, you’ll probably want a high-speed USB port if you plan to transfer a lot of home movies to your computer for editing, since your transfer speeds will be much faster.
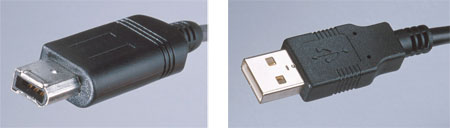
Mini DV camcorders use i.Link jacks (left) to transfer videos to a computer, while hard drive and mini DVD camcorders use USB ports (right).
Editing footage on your computer
There are a variety of software programs that you can use to edit videos you’ve transferred to your PC. If you ever did any tape-based editing with an old analog camcorder, you’ll probably be pleasantly surprised by the process of editing digital video on a computer. Not only does digital video tend to look better, but you won’t lose picture quality when you rearrange a sequence of video clips. And you can add all sorts of video effects afterwards, instead of having to apply them while filming.
Some camcorders will come with editing software, but it’s important to note that the included software is probably pretty basic. If you want more precise or advanced editing, you may need to purchase additional software. Our suggestion: test out the software that comes in the box, and see if it suits your needs. If not, you’ll have a better idea of the features you’ll want in a future editing software purchase.
Also, check out the editing software that may already be installed on your computer. If that doesn’t have all the features you want, then decide what kind of editing you want to do, and look around for the appropriate application.
Selecting software
You’ll want to ask yourself a few questions about each software program you consider:
- Will the software work with your operating system? Does your computer have the necessary memory, processor, and inputs? (Below, we’ve created a chart that will give you information on what we recommend for minimum and ideal computer setups for video editing.)
- Will the software work with your camcorder’s video files? Mini DV, DVD, hard drive, and high-definition camcorders can all record video in different formats. Be especially mindful of compatibility if you’ve got a high-def camcorder that records in the AVCHD file format. This format is relatively new, so manufacturers have only just started releasing versions of software that can edit these files.
- What do you want to do with your footage? Do you want to upload your video files to video-sharing websites? Do you want to burn DVDs, or store your HD footage on discs that play back on a Blu-ray player? Make sure the software you choose can export your edited video files in a format that will work with what you want to do.
- What kind of editing do you want to do? Do you want to add more than one audio track? Do you want to add effects and fades, or perform other advanced editing? Check out the software’s editing options to make sure it will let you be as creative as you want.
We’ve outlined a few software programs below that we’re familiar with, and that are worth checking out. Some are free, while others range in cost from under $100 to over $1,000. Remember to check the version of the software you choose — newer or older versions may have more or fewer features.
For Windows®:
- Windows Movie Maker® — This free software can be a great way to get started. Movie Maker offers basic editing for many standard-definition video formats. Versions that come with Vista® Premium and Ultimate operating systems add support for HDV files, which is the format used by high-definition Mini DV camcorders. It’s a good way to edit without spending any money, since it may already be on your computer. If not, it’s available as a free download for XP and Vista.
- Corel® uLead® VideoStudio® Pro X2 — This software supports many types of standard- and high-def video files, including HDV and AVCHD. It also comes with DVD authoring for high-def playback with 5.1 surround sound in high-def disc players.
- Pinnacle™ Studio™ Ultimate version 12 — This software supports many standard- and high-definition video formats, such as DV, HDV and AVCHD files. It also allows users to burn their high-def footage to regular DVDs for playback in compatible high-def disc players.
- Sony Vegas® Movie Studio — Platinum Edition 9 — This software offers support for many standard-def and high-def video file formats, including HDV and AVCHD. It also lets you burn high-def Blu-ray discs.
- Adobe® Premiere® Elements 7 — This software supports file formats from many standard- and high-def camcorders, including HDV and AVCHD. It allows you to put your edited footage on DVD or Blu-ray for playback and archiving. (Keep in mind that you’ll need a computer with a Blu-ray read/write drive to make your own Blu-ray discs.)
For Mac®:
- iMovie ’09 — This software comes installed on most newer Macs. It features support for many types of standard- and high-def video formats, including HDV and AVCHD. It’s a good program to start with, especially since it comes free with newer computers.
- Apple Final Cut Express 4 — This software expands the features of iMovie ’09 — it gives you more flexibility in editing with more audio/video possibilities. It supports many video file formats, including DV, HDV, and AVCHD.
- Apple Final Cut Studio 2 — This software offers real-time editing of many standard- and high-definition formats. It supports DV and HDV files. You’ll be able to store your HD footage in a high-resolution format for storage and playback.
All information posted above was accurate as of 5-1-2009.
Computer requirements
Most current computer systems handle digital video well, but if you have an older computer, take note: full-motion digital video takes up lots of memory, and high-definition full-motion video takes up even more. For example, five minutes’ worth of uncompressed video from a standard Mini DV camcorder uses 1 gigabyte of hard drive space — that means a half-hour video will take up 6 gigs. For digital video editing, we recommend you use a computer system with at least 30 gigabytes of hard drive space, although we recommend more free hard drive space for best performance. Below, you’ll find our computer system recommendations for editing standard- and high-definition video.
| Computer requirements | For standard-def video editing (minimum) | For standard-def video editing (ideal) | For high-def video editing (minimum) | For high-def video editing (ideal) |
| Total hard drive space | 30 gigabytes | 200+ gigabytes | 350+ gigabytes | 500+ gigabytes |
| RAM | 512 MB | 1+ GB | 2+ GB | system maximum |
| Processor speed | 1.2 gigahertz or equivalent | 1.2 gigahertz or equivalent | dual core 2.2 gigahertz or equivalent | dual core 2.2 gigahertz or equivalent |
| Inputs | USB/ i.LINK* | USB/ i.LINK* | USB/ i.LINK* | USB/ i.LINK* |
* Inputs will depend on the type of camcorder you choose — Mini DV camcorders typically use i.LINK outputs to transfer video, while DVD and hard drive camcorders typically use high-speed USB.

by Tara Wisnewski, Crutchfield.com. All rights reserved. (reprinted with permission, originally posted May 1, 2009)