Here’s a basic guide to setting the right contrast and black levels for your set and to understanding “the gray scale,” which is simply all the shades ranging from inky black, where you can’t see any detail, through various levels of gray to ultra-bright white. A well set-up TV set should be able to display a full range of black through gray to white and all the shades in between in order to deliver a reasonable approximation of the range from dark to light that our eyes register in real life.
Some manufacturers use terms like “Contrast,” “Picture,” and “White Level,” but they all mean the same thing — the range between the brightest and the darkest parts of an image — so check your TV set’s owner’s manual or on-screen menu to see which term is used and get familiar with it. And before you do any adjustments for Contrast and Brightness, set the level of your room lighting to the same conditions you use when you watch TV. If the room is brighter, you’re going to want a brighter and more contrasty image than if you watch TV in a dimly lit room. Be sure to turn off any auto-picture, auto flesh-tone and auto-contrast/sharpness enhancer settings as well, because these will affect the contrast and brightness settings.
“Brightness” also is called “Black Level,” though that sounds contradictory. In fact, it isn’t, because as you lower the brightness of a video display, the grays and shadows will get darker and darker until all detail is lost or buried in the black. The best way to adjust brightness is to use a “PLUGE” (Picture Line-up Generation Equipment) test pattern available on various set-up DVDs like the AVIA Guide to Home Theater or the Sound & Vision Home Theater Tune-Up DVD. The PLUGE pattern has a number of vertical black and gray bars that represent the various levels of black and is set correctly when the very blackest bar disappears into the background.
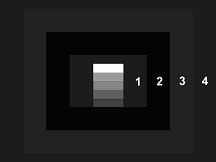
Contrast (White Level) is adjusted using a different test pattern from the same test DVDs, a series of five boxes ranging from dark gray to white with a pair of moving white bars on a white background. The contrast is correctly set when you can barely see the right-hand white bar.
You’ll need to alternately view these test patterns and tweak the adjustments because they do interact with each other.
If you don’t own a test pattern DVD or find using one too tedious and boring, then here’s a trick I used for years to adjust Brightness and Contrast. Find a TV channel (Turner Classic Movies is a good one) broadcasting older black and white movies made in the 1930s through the 1950s. These movies were beautifully lit and photographed to encompass the entire range of deep blacks to white, and serve as excellent “test” patterns. (You can also tune in a sharp, clear color program and turn down the color control until the picture appears in black and white.) Now alternately adjust the Brightness (Black Level) and Contrast controls until blacks that should be black are black, not gray, and you can still see some detail in shadow areas. Whites should be white, not gray, with details still visible in, for example, the fabric or tiny buttons of a white blouse worn by an actress. Once you have the black and white picture looking great, then move to a color channel or turn up the color control and work on color and tint. But we’ll leave those for another A/V tip.