
Walk into the average living room these days, and if there’s a shiny new LCD or plasma flat-screen TV on the wall, the likelihood of actually seeing a well-adjusted TV picture or even an acceptable one, is fairly doubtful. That’s mainly because most consumers unpack their new sets and run them with the manufacturer’s default picture settings, which are biased heavily towards maximum contrast, extremely saturated color and excessive brightness, all the better to make an impression on naive shoppers in the dazzling, fluorescent-lit showrooms of retail and big-box electronics chains.
However, once your set reaches your living room, the “Dynamic” setting (a common name for the factory default) should be banished from use: it often produces a garish, neon-like unrealistic picture with no detail in bright or shadow areas and almost cartoonish color and skin tones. So before you do anything else, turn off the Dynamic or “Vivid” setting and select “Cinema” or its equivalent and “User Settings.” One other suggestion, in passing:
Resist the urge to mount your LCD or plasma panel over the fireplace.
That kind of placement often puts the image uncomfortably high from a normal sitting height and most of us don’t like looking up that far. Besides, ambient heat from the fireplace may shorten the life of the set. Excessive heat is the enemy of all electronics.
What follows are five adjustments you can make anytime, even while you’re watching, that will greatly enhance the overall picture quality of your new TV no matter what the video source– Standard Definition TV, DVD movies, and High Definition programming from cable, satellite, off-air or from HD discs (Blu-ray/HD-DVD).
Turn down the room lighting.
This may seem obvious, but lots of viewers ignore it and put up with a degraded video picture. TV control rooms and mixing suites are very dimly lit for a reason, because no matter what type the display (LCD, plasma, CRT, DLP, LCoS, or video projector), it’s only in a dimly lit room that a TV image will show the full range of gradations from deep black through grays to white with all the nuances of color. The room doesn’t have to be pitch dark; set the lighting to the same level as an intimate restaurant where you can still read the menu. I’m not a fan of putting a small light behind the TV, an approach advocated by some critics-the “halo” effect behind the screen takes away from the impact and “pop” of the image. Instead, put a light elsewhere in the room that doesn’t cause reflections on the TV screen.
Before you try the following steps, connect your DVD player to your new display using the highest quality video input available, which for new HDTVs will be component video or HDMI/DVI, followed by S-Video and composite video for older standard TVs. Then call up the user menu for your new TV and click on “User Settings,” which will let you adjust specific picture qualities and will remember your settings. On some sets, the factory default modes (“Standard”, “Sports”, “Vivid” etc.) lock in picture settings and won’t let you make individual picture adjustments.
Three Simple Controls (you don’t have to buy special calibration DVDs):
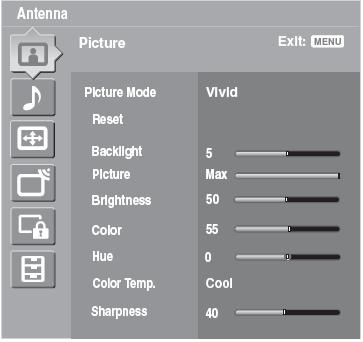
Brightness (black level)
This control is misnamed. It really should be called “Blackness” because this control actually sets how black or dark the darkest portions of the picture will appear on the screen. One good way to set this without going to special calibration DVDs is to load your DVD player with any wide-screen DVD you have that has “letterbox” black bars above and below the picture.
While you are watching the black bars above and below the image, turn up the black level (Brightness) control all the way until the black bars appear gray. That’s too far, because now anything black in the original video image will look gray. Now gradually bring the setting down until the gray bars just begin to look black. That’s the setting. When you look at the picture, anything that’s black should appear black, but look at shadow areas to see if you can make out some detail. You should be able to see a little detail in the shadows; if you can’t, then increase the Brightness just a bit-but only a bit– because you don’t want true blacks to turn gray.
Contrast (Picture)
The “Contrast” control is also a misnomer; it should be labeled “White Level” because it regulates how white the brightest parts of the picture will appear. To adjust this, find a scene on a DVD or a live broadcast that has a wide range of light to dark; even an outdoor sports broadcast with sunlit areas will do nicely. Now pause the DVD image (or freeze the image on live TV) and turn up the Contrast (White Level) control all the way until the very brightest areas lose all detail. Look for someone wearing a white shirt or light-colored clothing. When the control is set too high, you won’t be able to see the buttons on a shirt or the creases and texture of the cloth. Now reduce the setting until you can just begin to see the buttons or creases in the shirt or other details in white areas. That’s the spot to leave this control.
Different manufacturers of TV displays use their own system of demarcation or numbers for the above settings, so a number on one set won’t apply to another brand, but generally speaking, the Brightness and Contrast settings should be between about 30% and 50% of their maximum settings. On my Samsung DLP HDTV, I typically set the Brightness (Black Level) between about 32% and 44% of its range and the Contrast (“White Level”) at about 48 to 50%.
If you want to watch your display in a brightly lit room or daytime, you can always opt out of the Cinema setting and use a punchier “Standard” or “Sports” setting to yield a brighter and contrastier picture, or simply stay with “Cinema” and increase the Brightness and Contrast settings a little to compensate for the brighter room.
Color Temperature
Before we get to the Color or “Saturation” control, look on your TV set’s menu for a Color Temperature control. It adjusts the tendency of the set to provide “Cool,” blue-biased colors or reddish/orange-biased “Warm” colors. It affects all the colors your set reproduces as well as the Color and Tint adjustments, so set the color temp to “Warm” or “Low.” (As it comes from the factory, it may be set to “Cool.”)
Color (saturation)
Saturation or Color adjusts how intense or vivid the colors appear. If it’s set too high, colors will be cartoonishly intense and unreal. When the color is too low, the picture will appear bleached out and, well, colorless! Now pick a scene from a movie or studio talk show that has several different skin tones in the same scene. Turn up the color control until Caucasian faces look ruddy or sunburned. Now reduce the setting until the skin tones look natural with just a hint of pink; other skin colors should also look natural at that setting too. You have to strike a balance between natural-looking skin tones and other colored objects in the picture; and you may find you’ll need to tweak that setting for different video sources or movies of different vintages.
Final Tip
If it makes it easier for you, before you set the Brightness and Contrast controls, turn the Color control to zero, which will make the entire picture black and white. You may then find it easier to adjust Brightness (Black Level) and Contrast (White Level) without the distractions of all those other colors. Once you have Brightness and Contrast properly adjusted, then turn up the color control to re-introduce colors into the picture.
You may be wondering about “Tint” and “Sharpness.” Set Tint midway through its range and when the other settings are correctly adjusted, “Tint” should take care of itself. The “Sharpness” adjustment too is rather personal. Some viewers like a soft, film-like appearance; others prefer a kind of hyper-sharpness to the image. To start, put it at the midway position.
As to some of the special circuits included by different manufacturers to “hype” or exaggerate the video image, for the most part, sets will look most natural with those circuits turned off. Still, it’s your set so if you like the look, go ahead and use them.
As you become used to the controls on your new display and how they affect the picture, you’ll likely find you seldom have to adjust them except for minor tweaks to compensate for different broadcasts, DVDs and the peculiarities of some movie directors and cinematographers. Lately, there seems to be a trend among some movie directors for a kind of bleached-out, muted look a la “Minority Report” (for heaven’s sake, don’t use that DVD to make the aforementioned adjustments). Once all the basic controls are carefully set, “Minority Report” and other movies will appear the way the respective directors intended them to look.


