My pansat is keep freezing if i change channels to fast or something, the the reciver screen says 0 and it turns off..and eventually it turns back on but i ahte when it does this...what shoudl i do to fix it? help please...thanks
DumDude, try to force-load your factory bin to the receiver:
Have your loader with file selected ready on your computer. Turn ON the rear switch on Pansat and hit the loader button at the same time. It may take several dozen attempts, and you can try varying the timing--hit the loader button first, or flick the ON switch first, whatever. Having a few beers as you work helps too.
I have tried that force loading before also.It can bring it alive sometimes,but just seemed to prolong the enevitable of it dieing for good.After it's up and running it seems the chip is corrupted enough that it's only a matter of time before it's light's out for it.Anyway it's worth your time to try ,nothing to loose .Let us know how it works out for you.
But I'm thinking you be J-tagging within ! day of it running.
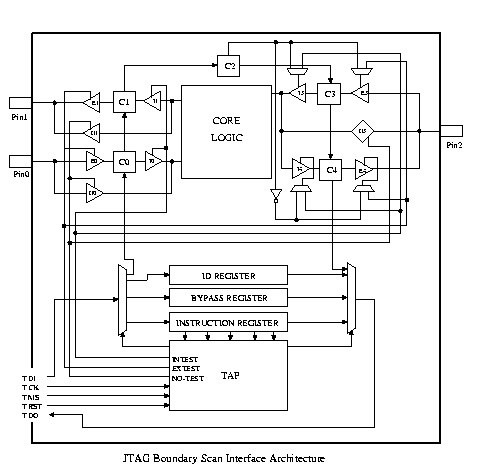
One of the difficult areas in the development of any modern hardware system is the production-testing of the Printed Circuit Boards (PCBs). This is the problem addressed by the IEEE standard number 1149 "Standard Test Access Port and Boundary-Scan Architecture". This standards defines a 5-pin serial protocol for accessing and controlling the signal-levels on the pins of a digital circuit, and has some extensions for testing the internal circuitry on the chip itself (which will not be discussed here). The standard was written by the Joint Test Action Group (JTAG) and the architecture defined by it is known as "JTAG boundary scan" or as "IEEE 1149".
The general structure of the JTAG boundary scan test interface is shown in the following figure
Caution: Make sure you know what you are doing. Use this instruction as your own risk. I'm not responsible for any device damage and/or human body injure.
This instruction comes with all the needed files. Read the "JTagThe2500A.pdf" first to get some general idea about the jtag. Say many thanks to the author of this "JTagThe2500A.pdf" although I don't know your name.
1 Making a jtag cable. You can make a buffered cable or a simple 5 resistor cable. Read the "JTagThe2500A.pdf" for how to make a buffered cable. I suggest you to make a buffered cable although I just make a 5 resistor cable and it working well.
I'm using a CAT5 network cable (about 1 meter) to make this JTAG cable. All the wires have a color so you won't mix them. I use 5 wires for signal and the rest 3 as GND.
Solder 5 100ohm resistors into DB25 Pin 2, 3, 4, 5 and 13. You can find the Pin number at the DB25 connector. Choose 5 wires and solder them into the other end of 5 resistors.
Solder the rest 3 wires to DB25 Pin 25, 23 and 21. You can choose any 3 Pins between DB25 Pin 18 to 25.
Write down the color and Pin number for future reference. Then you can close the DB25 cover.
Solder the other end of the CAT5 cable into Pansat JTAG connection. Pansat only have the JTAG solder pads. So you have to solder the cable into those pads or solder a PIN connector first. I just solder the cable into the pad. I hope I don't have to jtag it again. But who knows. If the Pansat still release the software likes the killer version 2.51, I may have to jtag it again.
On the Pansat PCB board, you can find the JTAG solder pads number. Solder the cable into the right pad. Use the information you just write down.
Solder the 3 wire GND into the Pansat PCB board. Do not solder them into the JTAG connection pads. Solder them into the big screw hold close to the front side.
Double check all the connections. Make sure they are all right. Make a incorrect cable can totally fry your box.
2 Now you are ready to jtag your Pansat 2500A. Take a break and have a deep breath.
3 Power down your box and connect the jtag cable into your PC printer port. Make sure the Pansat power switch is off and plug in the power cord.
4 Launch the wall.exe file. Ignore the warning about the ID.
5 Power on the Pansat. Click "Refresh Items" button on the wall. You will see a screen like this.
6 Run jkeys.exe. Ignore the worning about the port. Go to File->Preference and select "Parallel Port" then click OK
7 The jkeys will try to connect to your Pansat and display the jeys screen.
8 If you get any error message then power down your box and check the JTAG cable again and restart from step 2.
9 Select "Pansat 2500a" from the IRD model drop down list.
10 Click "Flash Programming" button and you will get a new dialog, just click OK and you will see the Flash Program screen.
11. Click Erase On the Chip/Sector Programming section.
12 Click Program on the Chip/Sector Programming section and select the Pansat boot6.bin file to program.
13 After the program finished, the Pansat will reboot and give you a knight rider. If you can get to this step then congratulation! Your Pansat has half life.
14. Close the jkeys and wall.
15 Take a break and have a deep breath.
16. Connect the RS232 cable into your Pansat. You don't have to remove the JTAG cable.
17 Run 2300-2500-1500 downloader.exe. Select the Pansat factory bin file and type "Pansat 2500A" for IRD type. Click download and want until it finished.
18. The Pansat will reboot and display "On".
Congratulations. Your Pansat 2500A is alive.
Pin numbering Inside Receiver is odd number on left even on right