Man I don't know how to jtag. I need to jtag pansat 2700a clone. It is know as skytech 2700a. What do I need to do, the procedure, files etc. Thanks buds.
c/p from ecoustics: for Pansat 2500 but there may be some useful info here.
How to JTAG your Pansat 2500A
Caution: Make sure you know what you are doing. Use this instruction as your own risk. I'm not responsible for any device damage and/or human body injure.
This instruction comes with all the needed files. Read the "JTagThe2500A.pdf" first to get some general idea about the jtag. Say many thanks to the author of this "JTagThe2500A.pdf" although I don't know your name.
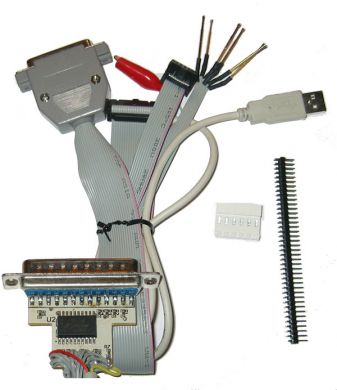
1 Making a jtag cable. You can make a buffered cable or a simple 5 resistor cable. Read the "JTagThe2500A.pdf" for how to make a buffered cable. I suggest you to make a buffered cable although I just make a 5 resistor cable and it working well.
I'm using a CAT5 network cable (about 1 meter) to make this JTAG cable. All the wires have a color so you won't mix them. I use 5 wires for signal and the rest 3 as GND.
Solder 5 100ohm resistors into DB25 Pin 2, 3, 4, 5 and 13. You can find the Pin number at the DB25 connector. Choose 5 wires and solder them into the other end of 5 resistors.
Solder the rest 3 wires to DB25 Pin 25, 23 and 21. You can choose any 3 Pins between DB25 Pin 18 to 25.
Write down the color and Pin number for future reference. Then you can close the DB25 cover.
Solder the other end of the CAT5 cable into Pansat JTAG connection. Pansat only have the JTAG solder pads. So you have to solder the cable into those pads or solder a PIN connector first. I just solder the cable into the pad. I hope I don't have to jtag it again. But who knows. If the Pansat still release the software likes the killer version 2.51, I may have to jtag it again.
On the Pansat PCB board, you can find the JTAG solder pads number. Solder the cable into the right pad. Use the information you just write down.
Solder the 3 wire GND into the Pansat PCB board. Do not solder them into the JTAG connection pads. Solder them into the big screw hold close to the front side.
Double check all the connections. Make sure they are all right. Make a incorrect cable can totally fry your box.
2 Now you are ready to jtag your Pansat 2500A. Take a break and have a deep breath.
3 Power down your box and connect the jtag cable into your PC printer port. Make sure the Pansat power switch is off and plug in the power cord.
4 Launch the wall.exe file. Ignore the warning about the ID.
5 Power on the Pansat. Click "Refresh Items" button on the wall. You will see a screen like this.
6 Run jkeys.exe. Ignore the worning about the port. Go to File->Preference and select "Parallel Port" then click OK
7 The jkeys will try to connect to your Pansat and display the jeys screen.
8 If you get any error message then power down your box and check the JTAG cable again and restart from step 2.
9 Select "Pansat 2500a" from the IRD model drop down list.
10 Click "Flash Programming" button and you will get a new dialog, just click OK and you will see the Flash Program screen.
11. Click Erase On the Chip/Sector Programming section.
12 Click Program on the Chip/Sector Programming section and select the Pansat boot6.bin file to program.
13 After the program finished, the Pansat will reboot and give you a knight rider. If you can get to this step then congratulation! Your Pansat has half life.
14. Close the jkeys and wall.
15 Take a break and have a deep breath.
16. Connect the RS232 cable into your Pansat. You don't have to remove the JTAG cable.
17 Run 2300-2500-1500 downloader.exe. Select the Pansat factory bin file and type "Pansat 2500A" for IRD type. Click download and want until it finished.
18. The Pansat will reboot and display "On".
Congratulations. Your Pansat 2500A is alive.
Pin numbering Inside Receiver is odd number on left even on right
K2 New member Username: Khai2
temple city , ca us Post Number: 3 Registered: Sep-05 Posted on Monday, September 19, 2005 - 02:52 am:
may not work on some computers.you may need an older version computer or laptop.
1-- i purchased my jtag cable thru ebay 2-- remove cover of sat box only 3 screws. 3-- make sure your sat box is off and your computer is not running any programs. 4-- connect your jtag cable to computer and to reciever. 5-- now turn on sat box on rear switch 6-- open skymax 2.2 can be dowloaded basically any site make sure its a recommended site. 7-- change setting under adr flash to setting 2mb (7FE00000) and make sure select LPT port 1. 8-- under connection click start and wait till complete then under flash operation select erase and wait till complete. 9-- now under flash operation you will select write a window will pop up at the bottom change from rom file to all files. then select the pansat 3500s-flash 1(29LV160CBTC-70)-full.once you selected this file skymax will automatically start the process of writing the file to your sat box.depeding on your computer it may take a while. 10-- once it says complete turn off sat box remove jtag cable. 11-- once jtag cable is removed turn on switch and the display screen should show b70,if so you have completed this procedure correctly. 12-- now you just have to load the boot file 80 and the current bin. 13-- enjoy.
2700 Clone Complete Jtag Kit This is a complete Jtag kit for 2700A N2 Pansat clones, including step by step instructions and programs and bins needed. www.dtv100.com/forums/20910-2700-clone-complete-jtag-kit*html - 54k - Cached - Similar pages (change * to .) C/P and paste to your browswer. you have to sign up to download this file but it may be worth it to you. Please let us know your progress on jtag.
Cybermaster, follow the info from Zulu. i have done it twice. it's very easy..but you have to follow the steps carefully. i can email you all you need to jtag your clone. right now i'm at work, i will email them tonight.