Rob's Kick Pod Build Log/Semi-Guide
|
Gold Member Username: Th3pwn3rI compensate... Post Number: 8154 Registered: Jul-06 | UGH! |
|
Gold Member Username: Th3pwn3rI compensate... Post Number: 8155 Registered: Jul-06 | F u c k, none of my pictures worked  |
|
Gold Member Username: Th3pwn3rI compensate... Post Number: 8157 Registered: Jul-06 | I'm a bit frustrated so I'll attempt to post it later on. |
|
Platinum Member Username: James1115Use a simple... Post Number: 10648 Registered: Dec-04 | thats really weird I was just looking at your pic's and I clicked the back button and they all dissapeared |
|
Gold Member Username: InsearchofbassPost Number: 9356 Registered: Jun-04 | they are working for me |
|
Gold Member Username: Th3pwn3rI compensate... Post Number: 8158 Registered: Jul-06 | ROFL. They weren't working for me so I deleted everything. HUGE FAIL lolz. |
|
Gold Member Username: InsearchofbassPost Number: 9357 Registered: Jun-04 | "thats really weird I was just looking at your pic's and I clicked the back button and they all dissapeared" same for me |
|
Gold Member Username: Philly306James Carrol is the re... Post Number: 1105 Registered: Apr-07 | I was able to see it before you deleted it and that looked great. You can obviosly tell you put alot of work into that. Nice job man. |
|
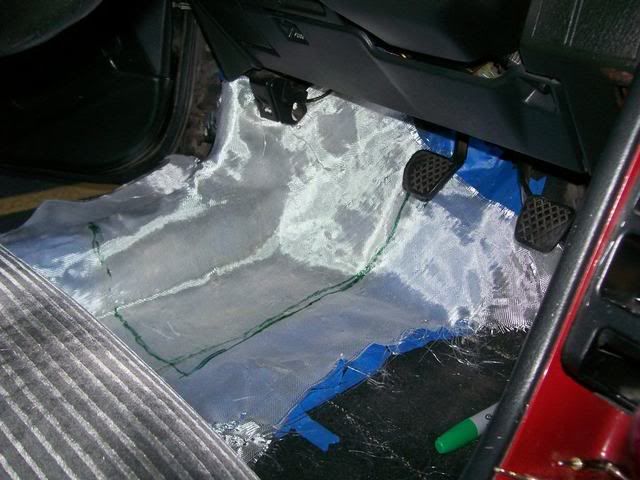
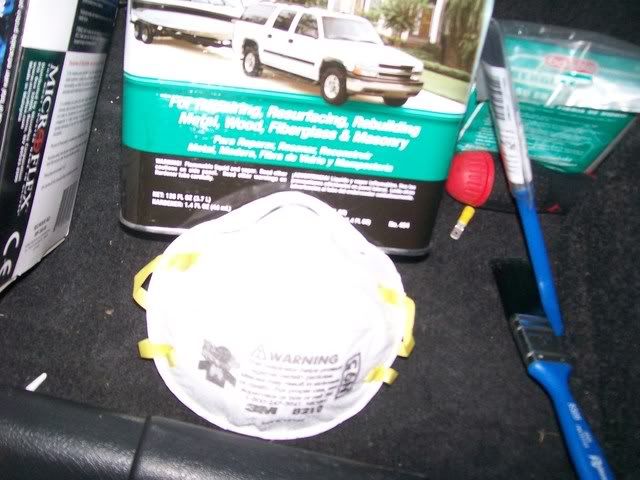
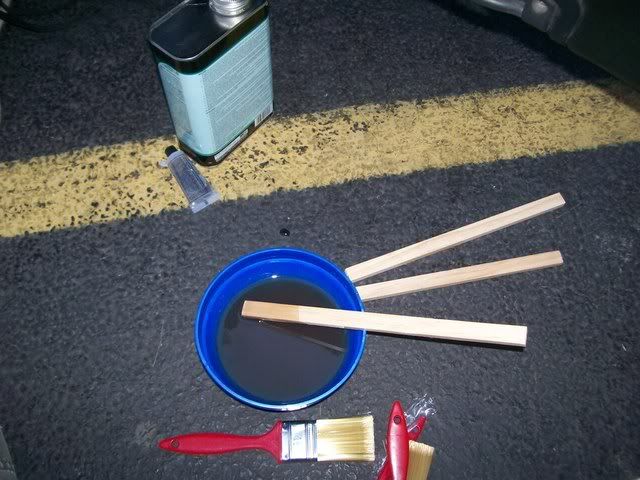
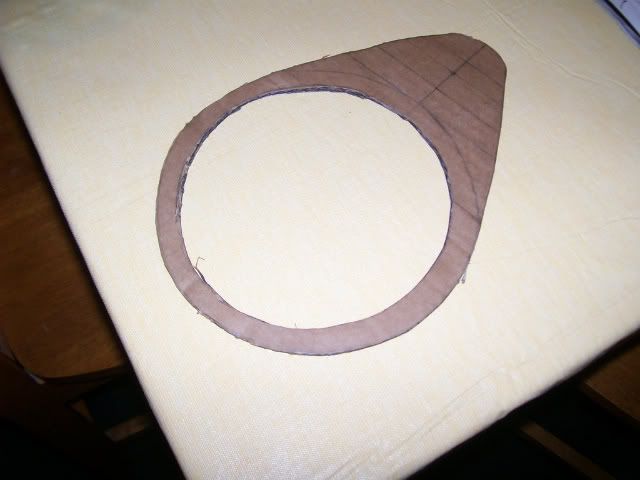
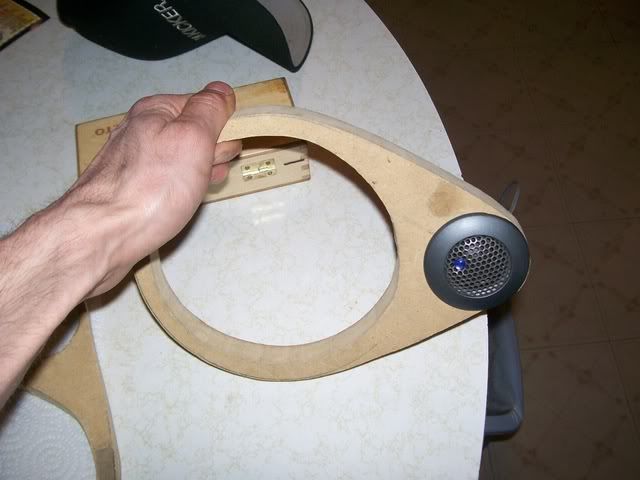
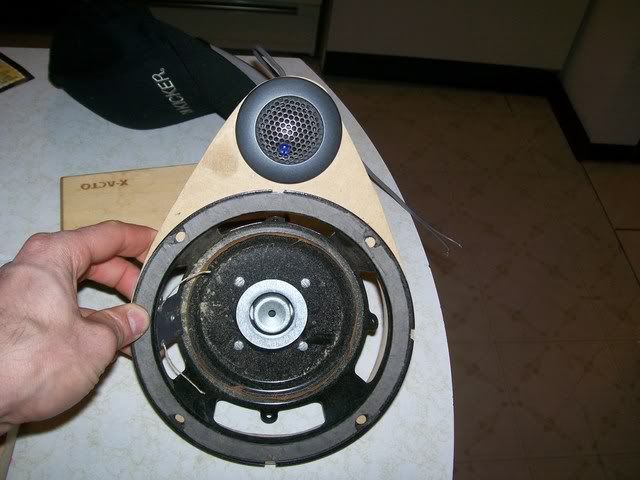
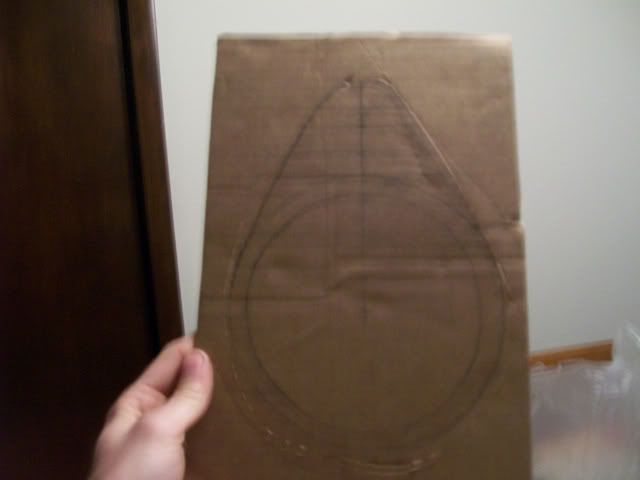
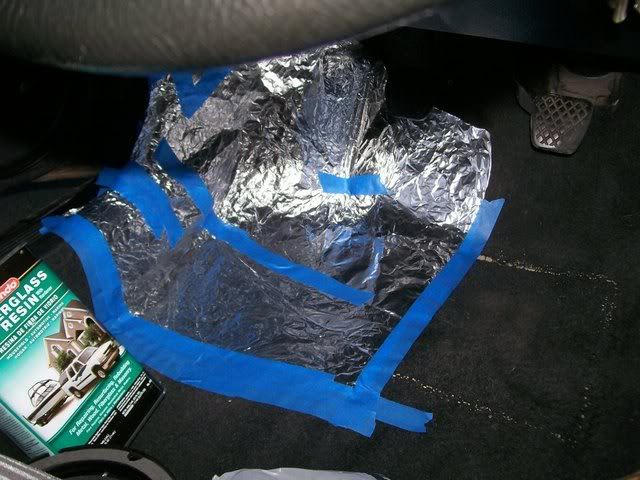
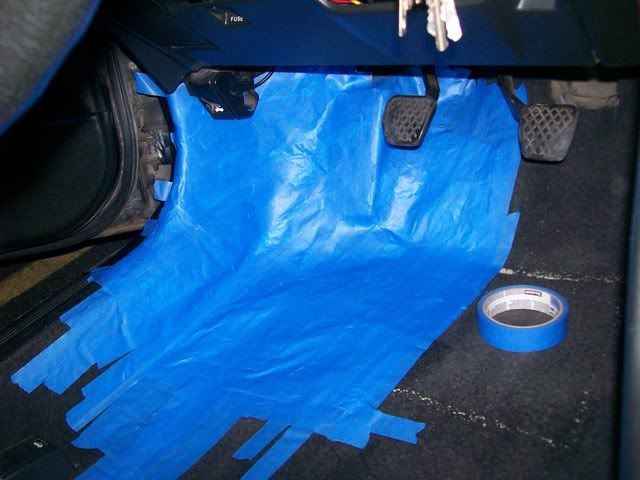
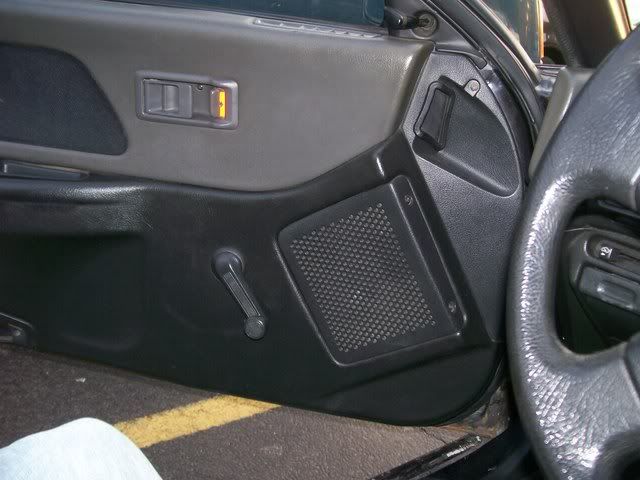
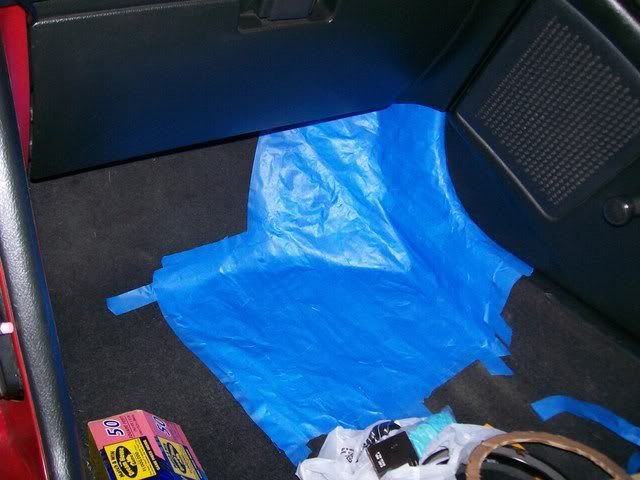
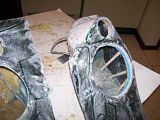
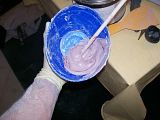
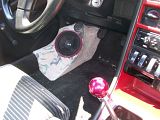
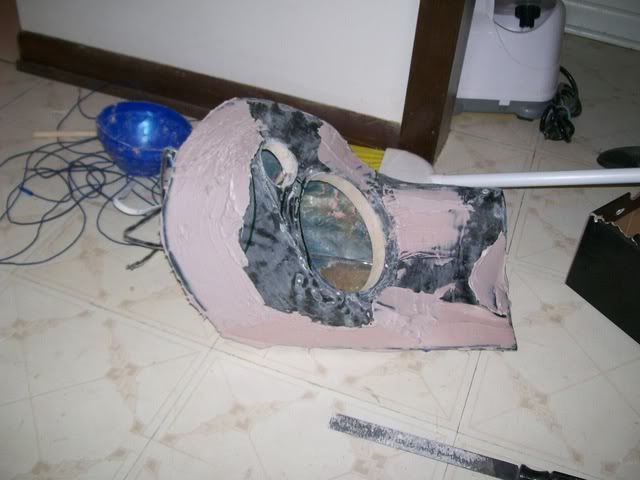
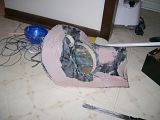
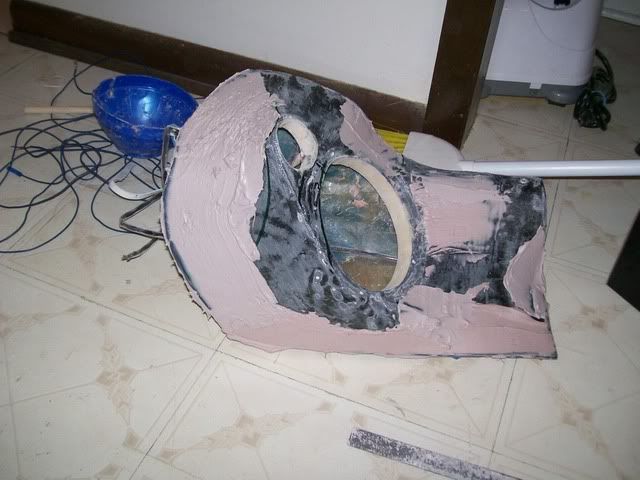
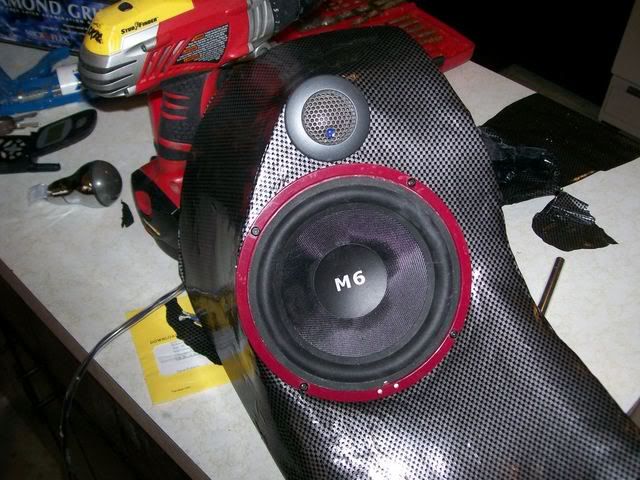
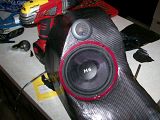
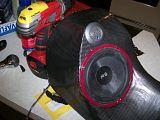
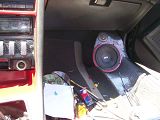
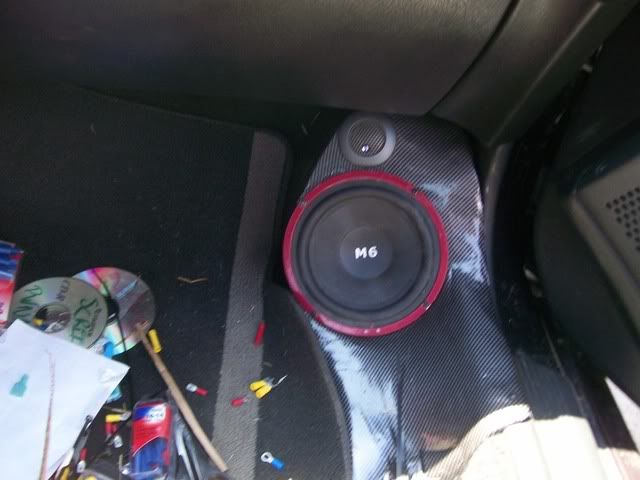
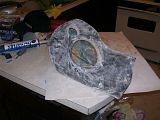
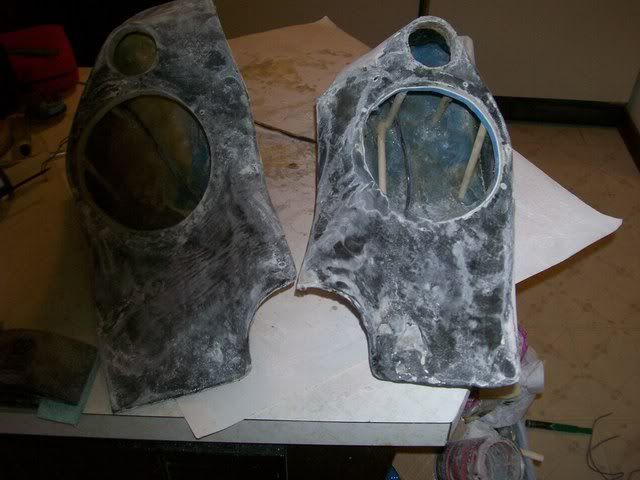
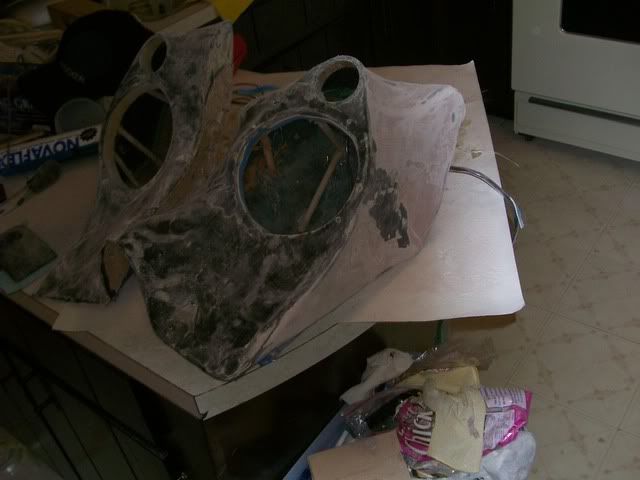
Gold Member Username: Th3pwn3rI compensate... Post Number: 8159 Registered: Jul-06 | Hey guys, this is my custom kick pod build log with LOTS of pictures. Enjoy! This was a pain in the azz by the way with the contours in the vehicle which is a 1989 CRX Si with B16A swap and full bolt ons. [IMG]http://i300.photobucket.com/albums/nn4/th3pwn3r/Pod%20Build/DriversDoor.jpg[/IMG] Here we have the driver's side door and once closed we pretty much have no room for any decent setup here. [IMG]http://i300.photobucket.com/albums/nn4/th3pwn3r/Pod%20Build/StockKick.jpg[/IMG] Here we have our driver's side kick which will have to be where we place our pods. [IMG]http://i300.photobucket.com/albums/nn4/th3pwn3r/Pod%20Build/PassengerDoor.jpg[/IMG] Passenger side kick. [IMG]http://i300.photobucket.com/albums/nn4/th3pwn3r/Pod%20Build/DriverMask1.jpg[/IMG] This is the first step to making custom kick pods after you have the vision in your mind. You have to mask off the area where you're going to create mold. I recommend that you mask off a large area so you don't get resin all over your carpet and ruin your interior. I used foil and tape to prevent any leak-through. [IMG]http://i300.photobucket.com/albums/nn4/th3pwn3r/Pod%20Build/PassengerMask1.jpg[/IMG] Passenger side masked off. [IMG]http://i300.photobucket.com/albums/nn4/th3pwn3r/Pod%20Build/DriverMask3.jpg[/IMG] Driver's side fully masked. Note the clutch pedal clearance, not much. [IMG]http://i300.photobucket.com/albums/nn4/th3pwn3r/Pod%20Build/PassengerMask2.jpg[/IMG] Passenger side fully masked. After finishing the masking you have to draw out the shape of your pods as best as possible. [IMG]http://i300.photobucket.com/albums/nn4/th3pwn3r/Pod%20Build/DriverMatLaidout.jpg[/IMG] Here you can see where I laid out my fiberglass cloth and traced through my old shape drawn on the masking. [IMG]http://i300.photobucket.com/albums/nn4/th3pwn3r/Pod%20Build/PassengerMatLaidout. jpg[/IMG] Here's the passenger side mat marked off, I'll have to say that I'm not a fan of mat and that I'll use cloth every time from now on. [IMG]http://i300.photobucket.com/albums/nn4/th3pwn3r/Pod%20Build/Latex.jpg[/IMG] Very important to have these latex gloves, I recommend buying them in bulk. They'll protect your skin and your hands won't be impossible to clean. [IMG]http://i300.photobucket.com/albums/nn4/th3pwn3r/Pod%20Build/FaceMask.jpg[/IMG] Another very important tool in using resin/fiberglass always use one of these masks, the fumes can burn your face just so you know. [IMG]http://i300.photobucket.com/albums/nn4/th3pwn3r/Pod%20Build/ResinMixed.jpg[/IMG] Resin all mixed up. I recommend you buy some cheap disposable bowls and get several of them. Make sure not to use too much hardener when mixing the resin or it will set or dry extremely fast. I recommend too little hardener than too much but make sure you mix it THOROUGHLY and mix it as you use it to avoid settling of the hardener. [IMG]http://i300.photobucket.com/albums/nn4/th3pwn3r/Pod%20Build/DriverResined.jpg[/IMG] Driver's side resined. For some reason my first layer of mat came apart on me on this side and it didn't happen on the passenger side but oh well, I fixed it with another couple of layers on top to provide strength to the mold. I recommend always doing any type of fiberglass pod with at least 2-3 layers of mat or cloth!!! [IMG]http://i300.photobucket.com/albums/nn4/th3pwn3r/Pod%20Build/PassengerResined2.jp g[/IMG] Passenger side resined. The mat used in the first layer was not the from the same package as used in the first and I'm not sure what caused the other side to fray apart and clump up so easily but this side came out just fine. [IMG]http://i300.photobucket.com/albums/nn4/th3pwn3r/Pod%20Build/MDFTemplate3.jpg[/IMG] What we have here is our speaker mount template. This will be the start of our pod frame. A compass will come in handy or an old speaker laying around to trace with. I free-handed these mostly and this step isn't required as you can just go straight to the MDF with your shape or design but this is my way of making things look a bit more uniform, I guess. [IMG]http://i300.photobucket.com/albums/nn4/th3pwn3r/Pod%20Build/MDFTemplateCut.jpg[/IMG] I used an exacto knife with a fresh blade to cut it decently and then fine tuned it. It's better to cut large and then shave or or fine trim the edges in this case. [IMG]http://i300.photobucket.com/albums/nn4/th3pwn3r/Pod%20Build/MDFTest.jpg[/IMG] Test fitting into the template, looks good! [IMG]http://i300.photobucket.com/albums/nn4/th3pwn3r/Pod%20Build/MDFTest2.jpg[/IMG] Then I took the template and traced it onto MDF and the above was the end result. [IMG]http://i300.photobucket.com/albums/nn4/th3pwn3r/Pod%20Build/MDFTest5.jpg[/IMG] Test fitting, fits great. You may want to make your mount a bit larger as this doesn't allow much room for your pod frame. [IMG]http://i300.photobucket.com/albums/nn4/th3pwn3r/Pod%20Build%20Stage2/PassengerPo dFrame.jpg[/IMG] Here you can see the pod frame in place on the passenger side. I used clay to molding clay to get angle, position and hold the speaker mount or plate in place, I did the same thing on the driver's side and checked for clearance for the clutch pedal many times to be on the safe side. You can use MDF strips, dowel rods, hell, I even heard of some people using chopsticks to assemble their pod frames. Nothing beats a hot glue gun to secure things and you can uses screws for extra strength if you please but if you glue it properly you'll be just fine. I recommend that you use a CORDLESS hot glue gun as it will be a lot quicker and less painful. [IMG]http://i300.photobucket.com/albums/nn4/th3pwn3r/Pod%20Build%20Stage2/DriverPodFr ame3.jpg[/IMG] Here we have the driver's side frame in place and once again note the clearance of the clutch pedal area. [IMG]http://i300.photobucket.com/albums/nn4/th3pwn3r/Pod%20Build%20Stage2/SideXSideMo ldedFrames3.jpg[/IMG] Since the pods had been secured to the molds it was time to take them out of the car and this is a great time to check the strength of your frame and fix any glue or screw joints. [IMG]http://i300.photobucket.com/albums/nn4/th3pwn3r/Pod%20Build%20Stage3/ClothWrappe dPass2.jpg[/IMG] Now that our pods are out of the car and the frames are sturdy and secured to our multi fiberglass layered mold we need to wrap the entire thing with something. You can use fiberglass mat or cloth or a number of things. I used a black sheet that had seen one too many sex marathons. [IMG]http://i300.photobucket.com/albums/nn4/th3pwn3r/Pod%20Build%20Stage3/WrappedSide XSide3.jpg[/IMG] Here the pods are side by side drying in my bathroom with the exhaust fan on and a fan blowing on them with the door closed, I should have probably sat in there until they dried to get a cheap buzz but whoo does that stuff stink. It's Polo's favorite hobby to sniff resin though and not mine. [IMG]http://i300.photobucket.com/albums/nn4/th3pwn3r/Pod%20Build%20Stage3/ResinedClot hTest.jpg[/IMG] Here we have our passenger side that has dried and I'm test fitting to make sure things fit well and they didn't. Filing and smoothening must be done to get a good seal. [IMG]http://i300.photobucket.com/albums/nn4/th3pwn3r/Pod%20Build%20Stage3/DriverBondo .jpg[/IMG] Here we have our first stage of bondo'ing and smoothening things out. Make sure to mix a little at a time as bondo sets or extremely fast, even when I used very little hardener I had a max of 3 minutes work time, make sure to mix it thoroughly. [IMG]http://i300.photobucket.com/albums/nn4/th3pwn3r/Pod%20Build%20Stage%204/SandedSi deXSide.jpg[/IMG] [IMG]http://i300.photobucket.com/albums/nn4/th3pwn3r/Pod%20Build%20Stage%204/SandedPa ss.jpg[/IMG] Here you can see how I sanded out whatever rough edges I could to smoothen these pods. [IMG]http://i300.photobucket.com/albums/nn4/th3pwn3r/Pod%20Build%20Stage%204/BondoAre as3.jpg[/IMG] [IMG]http://i300.photobucket.com/albums/nn4/th3pwn3r/Pod%20Build%20Stage%204/BondoAre as2.jpg[/IMG] [IMG]http://i300.photobucket.com/albums/nn4/th3pwn3r/Pod%20Build%20Stage%204/BondoAre as.jpg[/IMG] Here you can see all the areas I marked off that need attention from bondo. This is a great way to save yourself time of looking at it while your bondo is already mixed. Saves you a bit of trouble as you don't have to waste time spotting things that need fixing or filling. [IMG]http://i300.photobucket.com/albums/nn4/th3pwn3r/Pod%20Build%20Stage%204/BondoMix ed.jpg[/IMG] Here we have our bondo ready to fill out gaps and fix indentations or rough areas that we've pre-marked. [IMG]http://i300.photobucket.com/albums/nn4/th3pwn3r/Pod%20Build%20Stage%204/PassBond oed2.jpg[/IMG] Here we have our bondo'ed up pod and it doesn't look too pretty right now but we'll fix that by sanding or filing. I'd use extreme caution if you decide to use power tools to sand or grind these to shape because it'd be easy to ruin them so BE CAREFUL! [IMG]http://i300.photobucket.com/albums/nn4/th3pwn3r/Pod%20Build%20Stage%204/SandedBo ndoed.jpg[/IMG] Here we have our sanded and smoothened pods and need to be cleaned up before attempting to give them a wrapping of some sort or paint or whatever you choose for their final finish. Mine didn't turn out the best they could but I'll admit I got a bit impatient and said "Eh, look good enough for me" so they do have some defects but this is no show car so I'm not worried about it. [IMG]http://i300.photobucket.com/albums/nn4/th3pwn3r/Pod%20Build%20Stage%204/PassFina lWrap6.jpg[/IMG] Here is our wrapped passenger panel. I used a vinyl carbon fiber looking coating. I love the look of carbon fiber so this was perfect for me. I'll warn you though if you attempt to do it using a coating like this isn't easy as it sticks to whatever(including itself) and doesn't contour well to odd shapes like the pod that we have here. In short, it's difficult to wrap decently. [IMG]http://i300.photobucket.com/albums/nn4/th3pwn3r/Pod%20Build%20Stage%204/DriverPo dReady4Wrap.jpg[/IMG] [IMG]http://i300.photobucket.com/albums/nn4/th3pwn3r/Pod%20Build%20Stage%204/PassPodF inallyInstalled.jpg[/IMG] Here we have our pods pretty much finished and installed. Make sure to drill your holes just big enough for the wire to come through the back and you can then seal it with caulk or silicone, some people actually recommend drilling a 2'' hole into the base of the pod for venting but I won't be doing that. The passenger side is finished and mounted in it's final position. The driver's side hasn't been wrapped yet because I had only purchased one roll of the carbon fiber vinyl wrap due to the reason I had no idea if I could make it work but since I did I'll be picking up the other roll soon and wrapping it. Although this wasn't an easy or quick project it was beyond worth it. I've spent the last week busting my azz on this project and I haven't had any free time for anything. It's been work, work on the pods and then work out and then shower and sleep, that's how it's been for me but now that it's all pretty much done I can relax and enjoy my work. The sound and output of these pods is better than I expected that it would be. I'll have to work on tuning everything still as I've only been able to listen for a short bit. I still need to play with my DSP and balance to get the sound stage dialed in which I will. Either way I'm beyond pleased with how this project came out and if you're thinking about doing it, go for it, the reward is beyond worth it if you can do it right. I hope this isn't too crappy of a guide because I went through it kind of fast so I'm sure I left out some things. Thanks for reading and good luck if you take a stab at this, remember be patient, it's not a 1 day project. |
|
Gold Member Username: Th3pwn3rI compensate... Post Number: 8160 Registered: Jul-06 | Are the pictures showing up in the window or do you have to click the links though? I'm trying to get them posted so you don't have to link to it. |
|
Platinum Member Username: James1115Use a simple... Post Number: 10651 Registered: Dec-04 | they are not showing up and the links are not working anymore either it says they have nbeen deleted. |
|
Gold Member Username: Philly306James Carrol is the re... Post Number: 1106 Registered: Apr-07 | I have to click the links. I always have to resize the images then upload them to E to get the images to show up here. |
|
Gold Member Username: Th3pwn3rI compensate... Post Number: 8161 Registered: Jul-06 | Hmm. The links are broken now for some reason. I'll figure it out. |
|
Gold Member Username: Safe_crackerChicago, IL US Post Number: 4580 Registered: Jan-06 | Easier just to pick through them >http://s300.photobucket.com/albums/nn4/th3pwn3r/Pod%20Build/?start=0 |
|
Gold Member Username: Nyyfan1315 Mag USA Post Number: 9766 Registered: Jul-06 | Thanks Polo. Good job Rob. Nice little walk through as well man. |
|
Gold Member Username: InsearchofbassPost Number: 9359 Registered: Jun-04 | what i did see looked good Rob |
|
Gold Member Username: Th3pwn3rI compensate... Post Number: 8162 Registered: Jul-06 | I'm working on getting it fixed |
|
Gold Member Username: Safe_crackerChicago, IL US Post Number: 4581 Registered: Jan-06 | Looks good. We should all share are Photobucket albums  Polo.. >http://s237.photobucket.com/albums/ff98/Master_Safe_Cracker/?special_track=nav_t ab_my_albums |
|
Gold Member Username: Th3pwn3rI compensate... Post Number: 8163 Registered: Jul-06 | I tried resizing them and it still doesn't work properly. Talk about pissing me off  |
|
Gold Member Username: Th3pwn3rI compensate... Post Number: 8164 Registered: Jul-06 | I'm gonna ruin this thread even more lol. [IMG]http://i300.photobucket.com/albums/nn4/th3pwn3r/Pod%20Build/MDFTemplateCut.jpg[/IMG] [IMG]http://i300.photobucket.com/albums/nn4/th3pwn3r/Pod%20Build/MDFTemplate2.jpg[/IMG] [IMG]http://i300.photobucket.com/albums/nn4/th3pwn3r/Pod%20Build/MDFTest.jpg[/IMG] [IMG]http://i300.photobucket.com/albums/nn4/th3pwn3r/Pod%20Build/MDFTest2.jpg[/IMG] [IMG]http://i300.photobucket.com/albums/nn4/th3pwn3r/Pod%20Build/MDFTest3.jpg[/IMG] [IMG]http://i300.photobucket.com/albums/nn4/th3pwn3r/Pod%20Build/MDFTest4.jpg[/IMG] [IMG]http://i300.photobucket.com/albums/nn4/th3pwn3r/Pod%20Build/MDFTest5.jpg[/IMG] [IMG]http://i300.photobucket.com/albums/nn4/th3pwn3r/Pod%20Build/DriverMask1.jpg[/IMG] [IMG]http://i300.photobucket.com/albums/nn4/th3pwn3r/Pod%20Build/DriverMask2.jpg[/IMG] [IMG]http://i300.photobucket.com/albums/nn4/th3pwn3r/Pod%20Build/DriverMask3.jpg[/IMG] [IMG]http://i300.photobucket.com/albums/nn4/th3pwn3r/Pod%20Build/DriverMask4.jpg[/IMG] [IMG]http://i300.photobucket.com/albums/nn4/th3pwn3r/Pod%20Build/DriverMatLaidout.jpg[/IMG] [IMG]http://i300.photobucket.com/albums/nn4/th3pwn3r/Pod%20Build/DriverResined.jpg[/IMG] [IMG]http://i300.photobucket.com/albums/nn4/th3pwn3r/Pod%20Build/DriversDoor.jpg[/IMG] [IMG]http://i300.photobucket.com/albums/nn4/th3pwn3r/Pod%20Build/FaceMask.jpg[/IMG] [IMG]http://i300.photobucket.com/albums/nn4/th3pwn3r/Pod%20Build/Latex.jpg[/IMG] [IMG]http://i300.photobucket.com/albums/nn4/th3pwn3r/Pod%20Build/PassengerDoor.jpg[/IMG] [IMG]http://i300.photobucket.com/albums/nn4/th3pwn3r/Pod%20Build/PassengerMask1.jpg[/IMG] [IMG]http://i300.photobucket.com/albums/nn4/th3pwn3r/Pod%20Build/PassengerMask2.jpg[/IMG] [IMG]http://i300.photobucket.com/albums/nn4/th3pwn3r/Pod%20Build/PassengerMatLaidOut2 .jpg[/IMG] |
|
Gold Member Username: Safe_crackerChicago, IL US Post Number: 4582 Registered: Jan-06 |  You ain't doing it right. You need to have them on your HD, rsize to a max of 599x599 and a max 100 bites. Use the EC's uploader.. Polo. |
|
Gold Member Username: Th3pwn3rI compensate... Post Number: 8165 Registered: Jul-06 | Yea, using the Ecoustics uploader sucks donkey D. |
|
Gold Member Username: Denali_on_22sI get Bucks like Milwa... Post Number: 5969 Registered: Feb-06 | You have to upload them to make it where there are no links. this site is ghetto. |
|
Platinum Member Username: WingmanaliveA pic is worth 1000 posts!! Post Number: 16901 Registered: Jun-06 |    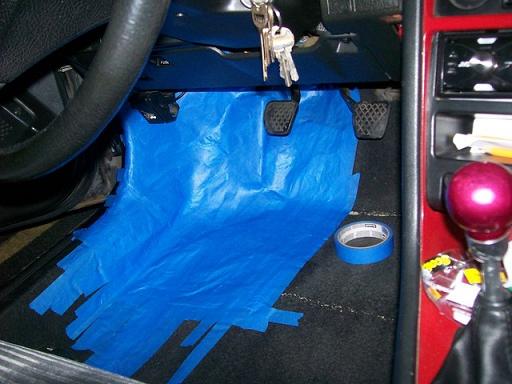 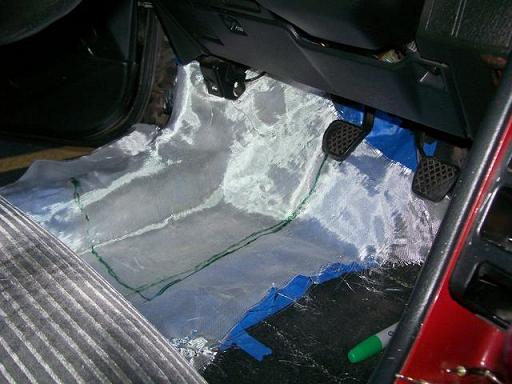   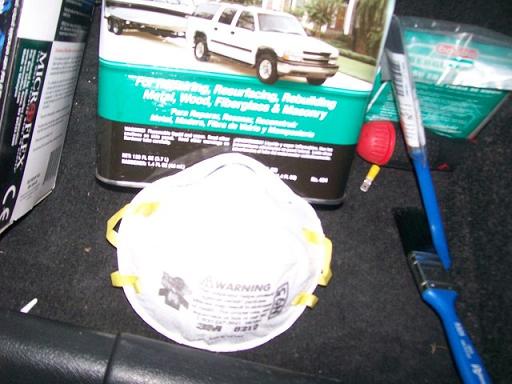 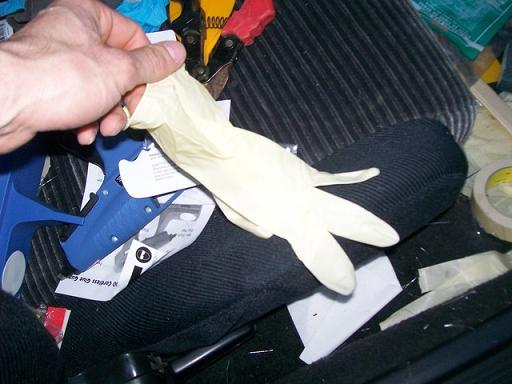 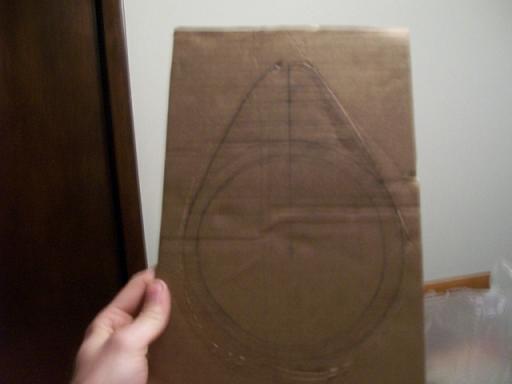 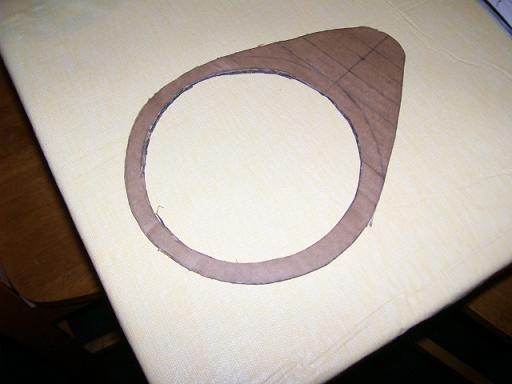 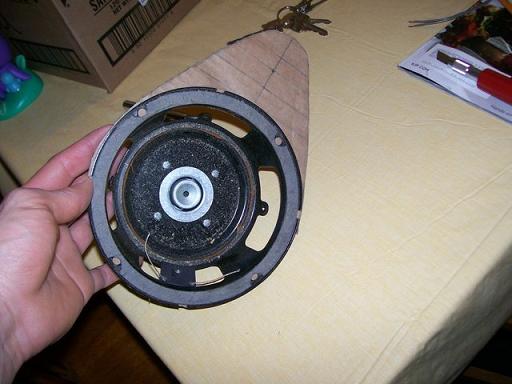  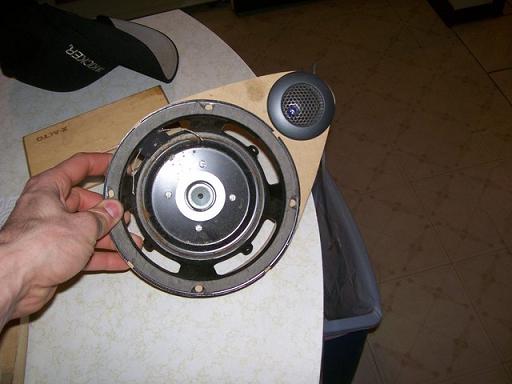 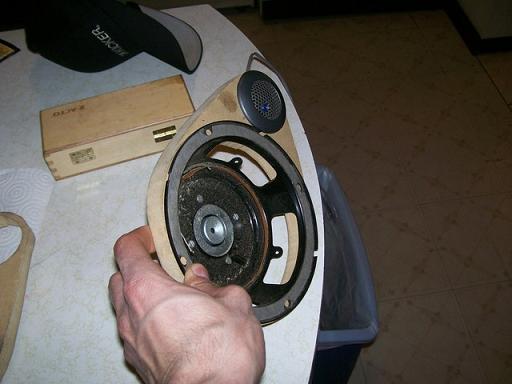  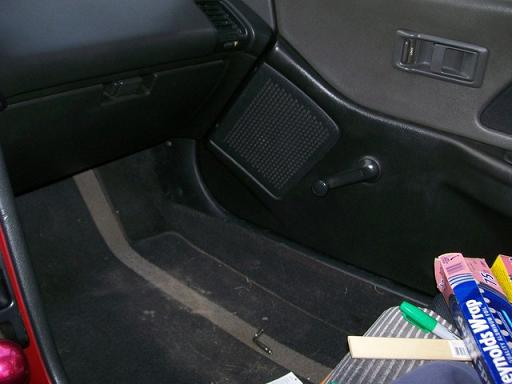 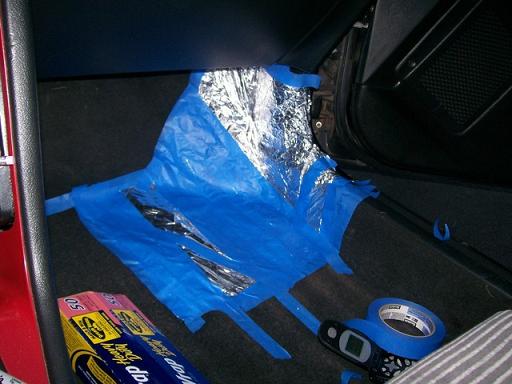 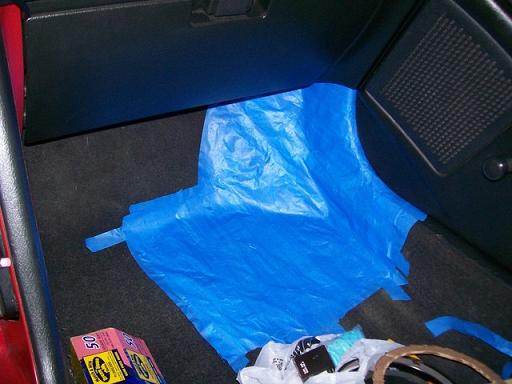 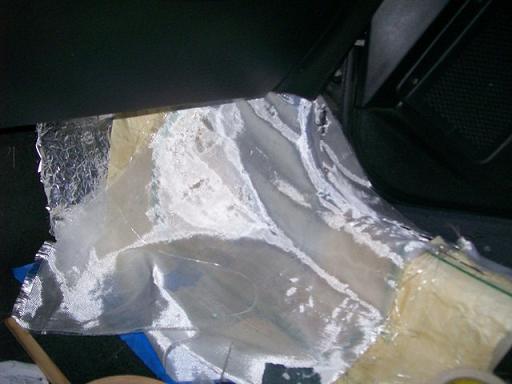 |
|
Gold Member Username: FrkkevinTeam DLSSuperNatural... Post Number: 5183 Registered: Nov-05 | where are those installed pics |
|
Gold Member Username: Th3pwn3rI compensate... Post Number: 8168 Registered: Jul-06 | I was working on it =/ I resized them all and got bored and said F it lol. I'll try to redo it. |
|
Gold Member Username: FrkkevinTeam DLSSuperNatural... Post Number: 5184 Registered: Nov-05 | looks like thats the only ones missing, looks good so far. Where did you pick up the carbon fiber vinyl? It look pretty good in person? Might pick some up and use it in parts of my trunk install |
|
Gold Member Username: Th3pwn3rI compensate... Post Number: 8170 Registered: Jul-06 | Let's try this one last time... Here we have the driver's side door and once closed we pretty much have no room for any decent setup here. 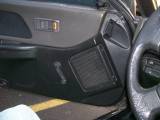 Passenger side fully masked. After finishing the masking you have to draw out the shape of your pods as best as possible. Passenger side masked off. Here we have our driver's side kick which will have to be where we place our pods. 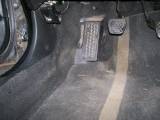 Passenger side kick. 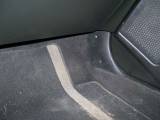 This is the first step to making custom kick pods after you have the vision in your mind. You have to mask off the area where you're going to create mold. I recommend that you mask off a large area so you don't get resin all over your carpet and ruin your interior. I used foil and tape to prevent any leak-through. 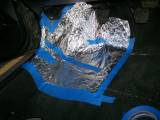 Passenger side masked.   Driver's side fully masked. Note the clutch pedal clearance, not much.  Passenger side fully masked.  I think this forum messed this all up... |
|
Gold Member Username: Th3pwn3rI compensate... Post Number: 8172 Registered: Jul-06 | Ugh, the tiny pictures suck big D. |
|
Gold Member Username: Th3pwn3rI compensate... Post Number: 8173 Registered: Jul-06 | [URL=http://i300.photobucket.com/albums/nn4/th3pwn3r/Pod%20Build%20Stage%204/BondoAre as-1.jpg][IMG]http://i300.photobucket.com/albums/nn4/th3pwn3r/Pod%20Build%20Stage%204/th_Bondo Areas-1.jpg[/IMG][/URL] [URL=http://i300.photobucket.com/albums/nn4/th3pwn3r/Pod%20Build%20Stage%204/BondoAre as.jpg][IMG]http://i300.photobucket.com/albums/nn4/th3pwn3r/Pod%20Build%20Stage%204/th_Bondo Areas.jpg[/IMG][/URL] [URL=http://i300.photobucket.com/albums/nn4/th3pwn3r/Pod%20Build%20Stage%204/BondoAre as2.jpg][IMG]http://i300.photobucket.com/albums/nn4/th3pwn3r/Pod%20Build%20Stage%204/th_Bondo Areas2.jpg[/IMG][/URL] [URL=http://i300.photobucket.com/albums/nn4/th3pwn3r/Pod%20Build%20Stage%204/BondoAre as3.jpg][IMG]http://i300.photobucket.com/albums/nn4/th3pwn3r/Pod%20Build%20Stage%204/th_Bondo Areas3.jpg[/IMG][/URL] [URL=http://i300.photobucket.com/albums/nn4/th3pwn3r/Pod%20Build%20Stage%204/BondoMix ed.jpg][IMG]http://i300.photobucket.com/albums/nn4/th3pwn3r/Pod%20Build%20Stage%204/th_Bondo Mixed.jpg[/IMG][/URL] [URL=http://i300.photobucket.com/albums/nn4/th3pwn3r/Pod%20Build%20Stage%204/DriverPo dReady4Wrap.jpg][IMG]http://i300.photobucket.com/albums/nn4/th3pwn3r/Pod%20Build%20Stage%204/th_Drive rPodReady4Wrap.jpg[/IMG][/URL] [URL=http://i300.photobucket.com/albums/nn4/th3pwn3r/Pod%20Build%20Stage%204/PassBond oed.jpg][IMG]http://i300.photobucket.com/albums/nn4/th3pwn3r/Pod%20Build%20Stage%204/th_PassB ondoed.jpg[/IMG][/URL] [URL=http://i300.photobucket.com/albums/nn4/th3pwn3r/Pod%20Build%20Stage%204/PassBond oed2.jpg][IMG]http://i300.photobucket.com/albums/nn4/th3pwn3r/Pod%20Build%20Stage%204/th_PassB ondoed2.jpg[/IMG][/URL] [URL=http://i300.photobucket.com/albums/nn4/th3pwn3r/Pod%20Build%20Stage%204/PassFina lWrap5.jpg][IMG]http://i300.photobucket.com/albums/nn4/th3pwn3r/Pod%20Build%20Stage%204/th_PassF inalWrap5.jpg[/IMG][/URL] [URL=http://i300.photobucket.com/albums/nn4/th3pwn3r/Pod%20Build%20Stage%204/PassFina lWrap6.jpg][IMG]http://i300.photobucket.com/albums/nn4/th3pwn3r/Pod%20Build%20Stage%204/th_PassF inalWrap6.jpg[/IMG][/URL] [URL=http://i300.photobucket.com/albums/nn4/th3pwn3r/Pod%20Build%20Stage%204/PassPodF inallyInstalled.jpg][IMG]http://i300.photobucket.com/albums/nn4/th3pwn3r/Pod%20Build%20Stage%204/th_PassP odFinallyInstalled.jpg[/IMG][/URL] [URL=http://i300.photobucket.com/albums/nn4/th3pwn3r/Pod%20Build%20Stage%204/PassPodF inallyInstalled2.jpg][IMG]http://i300.photobucket.com/albums/nn4/th3pwn3r/Pod%20Build%20Stage%204/th_PassP odFinallyInstalled2.jpg[/IMG][/URL] [URL=http://i300.photobucket.com/albums/nn4/th3pwn3r/Pod%20Build%20Stage%204/SandedPa ss.jpg][IMG]http://i300.photobucket.com/albums/nn4/th3pwn3r/Pod%20Build%20Stage%204/th_Sande dPass.jpg[/IMG][/URL] [URL=http://i300.photobucket.com/albums/nn4/th3pwn3r/Pod%20Build%20Stage%204/SandedSi deXSide.jpg][IMG]http://i300.photobucket.com/albums/nn4/th3pwn3r/Pod%20Build%20Stage%204/th_Sande dSideXSide.jpg[/IMG][/URL] [URL=http://i300.photobucket.com/albums/nn4/th3pwn3r/Pod%20Build%20Stage%204/SandedBo ndoed.jpg][IMG]http://i300.photobucket.com/albums/nn4/th3pwn3r/Pod%20Build%20Stage%204/th_Sande dBondoed.jpg[/IMG][/URL] |
|
Gold Member Username: Th3pwn3rI compensate... Post Number: 8174 Registered: Jul-06 | http://s300.photobucket.com/albums/nn4/th3pwn3r/Pod%20Build%20Stage%204/?action= view¤t=PassPodFinallyInstalled2.jpg I should just post this over on Caraudio.com it'd be much simpler. |
|
Gold Member Username: Van_manBoston South, MA Post Number: 3986 Registered: Mar-06 | lol' Stick to making pods, You photo skills sux. But nice effort. Looks Good. Thanks Paul, I hate linking to pics. |
|
Gold Member Username: FrkkevinTeam DLSSuperNatural... Post Number: 5185 Registered: Nov-05 | how much room is there for the clutch? thought about doing pods in my rex but im tempted to just redo the top of the dash and mount everything there |
|
Gold Member Username: BernymacCambodia Post Number: 3999 Registered: Sep-04 | this forum is seeing a big jump in fiberglassing threads . Good job rob. |
|
Gold Member Username: Th3pwn3rI compensate... Post Number: 8175 Registered: Jul-06 | "lol' Stick to making pods, You photo skills sux. But nice effort. Looks Good. Thanks Paul, I hate linking to pics." Well, Ecoustics isn't very friendly for pictures either so that doesn't help. I did try my best though. Kevin, there's enough room to drive comfortably. You also asked about the wrap and it actually looks good but there are a couple of types out there and to me the one I chose looked the best. Not easy to work with on contoured things that's for sure. |
|
Gold Member Username: Th3pwn3rI compensate... Post Number: 8176 Registered: Jul-06 | The best part about all of this is that I can't even enjoy it right now because yesterday I snapped my shift linkage and had to push my car home 3 blocks lol =/ My world came crashing down on me yesterday. |
|
Platinum Member Username: James1115Use a simple... Post Number: 10654 Registered: Dec-04 | thats no fun!!! pods look nice though Rob if it helps at all |
|
Silver Member Username: WaresgaragestereoFort Valley, GA Post Number: 184 Registered: Mar-08 | nice work on the pods u shud make one post and post all photos from start to finish. less confusing that way. |
|
Gold Member Username: Th3pwn3rI compensate... Post Number: 8178 Registered: Jul-06 | "nice work on the pods u shud make one post and post all photos from start to finish. less confusing that way." Lol, I tried that and failed. |
|
Diamond Member Username: BestmankindPost Number: 21036 Registered: Oct-05 | you got some skills rob. good job. |
Main Forums
Today's Posts- Home Audio Forum
- Home Video Forum
- Home Theater Forum
- Car Audio Forum
- Accessories Forum
- All Forum Topics