Dual 505-2 humming
|
New member Username: ShaunwyattPost Number: 1 Registered: Dec-11 | Hi,i have a dual 505 which i have been given,I have put a new stylus and belts on changed the RCA leads cleaned the earth contacts and the cartridge contacts but i still get a loud humming.I have tried the turntable on two amps with the same problem.When i touch the wires on the contact plate the humming gets louder. Thanks Shaun |
|
Platinum Member Username: Jan_b_vigneDallas, TX Post Number: 16963 Registered: May-04 | . Do you have a ground cable running from the table to the ground lug of your receiver or pre amp? This is always a thin, single black wire running from the underneath of the table alongside the RCA cable outputs. It must be attached to either a ground lug or an unpainted chassis screw on the receiver or pre amp. http://www.dual-reference.com/index.html . |
|
New member Username: ShaunwyattPost Number: 2 Registered: Dec-11 | Thanks for the reply Jan Yes i have put a new lead on i have also put a earth lead to the plug and is still the same |
|
Platinum Member Username: Jan_b_vigneDallas, TX Post Number: 16969 Registered: May-04 | . Then I would say you need to get the table serviced by a qualified technician. Duals are pretty simple tables with pretty much identical but simple problems. They use a slide in headshell cartridge and the lead pins on the cartridge and the headshell contacts often become oxidized which leads to a poor ground connection. That's what you're hearing is a 60Hz ground hum. If the ground cable didn't solve the problem, then the options for where to fix the ground are slim. Did you install the ground cable yourself? If so, where did you attach it at the table and the receiver? On occasion, an older Dual will have bad RCA's and the lead cable will need to be replaced and resoldered under the table's plinth. If the hum is constant and you can't make it go away by moving the lead cables around, then I doubt this is the problem. But a solder joint under the table might have become open or was cold when you replaced the lead cable and that would lead to a hum. You soldered this cable yourself? To the underside of the table or how did you replace the lead cable? You're going to have to remove the plinth from the base and that's not exactly a job for someone who has never seen this done on a Dual. The Dual webpage I linked to above should have some instructions on how this is done. What cartridge are you using? A very few cartridges still have a ground tab on the back of the cartridge pins and that tab needs to be removed to prevent a hum. The only current line of cartridges I know of that might still have such a tab are the Grados. Also, of course, make certain you have the the cartridge wired correctly in the headshell. The headshell wires are very thin and often break when a new cartridge is installed. It's possible someone broke a wire at one time and then did a crappy job of repairing it. The clips which attach the cartridge to the headshell leads can be corroded or do not make a tight fit on the cartidge pins. If this is the case, be very, very careful about retensioning the clip. It's all to easy to push a bit too hard and collapse the clip which will make it worthless and a pain to replace. Those are the most common ground hum problems with a 505. There is a very slight chance a tonearm wire has been broken inside the arm but that's pretty rare. You say this was given to you. Do you know whether the table was in good operational condition when you received it? If it had been in storage for a few years all of the oxidation problems are the most likely to be your problem. Do you have any sort of test meter which would indicate continuity? A VOM? Or, just a simple continuity tester? If so, begin at the headshell itself - with out the cartridge installed - and check for any opens in the cables. A check with the cartridge in place will show continuity between channels and between + and - and isn't an indication of the condition of the table. . |
|
New member Username: ShaunwyattPost Number: 3 Registered: Dec-11 | Thanks very much Jan I will run through every thing you said this afternoon after work Thanks very much again Shaun |
|
New member Username: ShaunwyattPost Number: 4 Registered: Dec-11 | Hi again Jan I replaced the original cable and screwed it in the same place.I have removed the plinth and soldered new RCA cables to the contact plate. I have cleaned what connections i can see on the headshell but the hum is still there even when the headshell has been removed. I am going to buy a pre amp tomorrow and get it set up on my Rotel amp in the spare room away from any interference I have a multimeter as well which i will run through what you suggested. Thanks again Jan |
|
New member Username: ShaunwyattPost Number: 5 Registered: Dec-11 | Still the same problem I have power supply disconnected and all the wires from the contact plate removed as soon as i connect the rca plugs the hum starts. All the wires check out fine from the cartridge back to the contact plate Thanks Shaun |
|
Platinum Member Username: Jan_b_vigneDallas, TX Post Number: 16973 Registered: May-04 | . I've listed every point which might cause a hum on a 505. At this point I would say you need someone who can physically look at the table and make a diagnosis based upon what they see. About the only other thing I would suggest you try is to connect only one channel of the cartridge. The ground is common to both channels but you might have more luck if only one channel exhibits the hum. That would allow you to at least minimize the locations where the hum is originating. You haven't said why you changed the lead cable. Or whether the table was operating normally when you first received it. Do you know whether the table had a hum problem before you changed the lead? And, you didn't change cartridges, right? You just installed a new stylus assembly into the old cartridge body? . |
|
New member Username: ShaunwyattPost Number: 6 Registered: Dec-11 | Hi Jan No i have not changed the power lead, i will try that The table was a friends and it did work but been in storage for about 10 years Yes i had the hum as soon as i my friend gave it to me and it is the original cartridge with a new stylus Looks more and more like the cartridge is at fault |
|
Platinum Member Username: Jan_b_vigneDallas, TX Post Number: 16974 Registered: May-04 | . No, I didn't mean the AC lead. I meant the original RCA phono cable lead from the table. Unless a cable is proven to be defective or has cracked insulation which might present a fire or safety hazard, there is no need to replace a cable. I wouldn't change the AC lead now unless it is defective. Figure out your hum problem before you start changing anything else. The hum is not originating in the AC feed to the table - which only runs to the table's motor and has no electrical connection to the cartridge. The hum is caused by a floating or open ground between the cartridge, the arm and the pre amp. If you eliminated the tonearm and the table itself by simply connecting the cartridge directly to the phono pre amp, you wouldn't have hum. You can try changing the cartridge but I've never seen a cartridge become defective to the point it causes a hum. About the only way this could happen would be an open ground wire inside the cartridge. That might have happened if someone tried to solder a connection while the cartridge was still connected to the headshell leads, but that shouldn't ever happen. If you have both channels passing signal, then there are no opens in the leads from the cartridge to the point where the RCA lead from the table connects to the pre amp. In other words, if the cartridge operates normally other than having a hum, then the cartridge is not defective. Both channels do work, right? Other than having an overriding hum, they do pass a signal, right? And you have checked the cartridge wiring to make sure it is properly done as far as + and - leads? What cartridge are you using? It wouldn't be a P-mount, would it? And you've checked to make sure the tonearm's headshell and the cartridge mounting bracket are making good contact with each other? . |
|
Gold Member Username: MagfanUSA Post Number: 2644 Registered: Oct-07 | Could some malf have occurred when the OP changed stylus? |
|
New member Username: ShaunwyattPost Number: 7 Registered: Dec-11 | Yes both channels work but just loud hum with music very low in the background when turned right up.The cartridge looks original The RCA leads are new and check out from the wiring into the cartridge I have the cartridge disconnected from the arm and the stylus out.Should the 4 wires red,blue,green and white have continuity to the 4 pins in the stylus holder?Only the green wire has any continuity which is on the outside of the stylus holder not with any pins. I am a bit of a newbie at this kind of thing Thanks Shaun |
|
Platinum Member Username: Jan_b_vigneDallas, TX Post Number: 16975 Registered: May-04 | . "Yes both channels work but just loud hum with music very low in the background when turned right up" This doesn't sound right. Are you sure the receiver or pre amp you're using has an active phono stage? You mentioned in an earlier post you intended to buy a pre amp. All I've seen you mention so far are "amps". Even wthout a ground connection from the arm, the table should be outputting a listenable level of volume. You do understand, I hope, that a turntable with a magnetic cartridge - which cartridge are you using? - must be connected to an active phono pre amp stage. Plugging the table directly into a line level input on a receiver or a power amp will not provide a listenable level from the cartridge and will be accompanied by a large amount of hum. Shaun, what receiver or amplifier are you plugging this table into? Does it have a phono pre amp built in? Are you sure? Not just an input labelled "Phono", it actually has an active phono pre amp inside? And that phono pre amp is set up to take the input of a moving magnet cartridge? If you don't know, we need to stop right now and sort this out. What cartridge are you using? I have to have information if I'm going to help you. I ask questions because I need to know answers. Right now you've got me thinking there is nothing wrong with the table as is but your connection isn't to the right input. Trying to solve a problem which does not exist has a very high probablity some other problem will be created. Are you certain there is still a stylus on the end of the cantliever? If you've broken the stylus off the cantilever, there will be exteremely low volume from the cartridge as there simply is nothing tracking in the record groove. Are you absolutely sure you have a good stylus? New doesn't count, it's very easy for a newbie to snap a stylus off the cantilever during installation. Check the stylus and report back. Don't guess, just because you feel something on the end of the cantilever doesn't mean there is a stylus. You could simply be feeling the bonding pipe which would hold the stylus in place. " I have the cartridge disconnected from the arm and the stylus out.Should the 4 wires red,blue,green and white have continuity to the 4 pins in the stylus holder?Only the green wire has any continuity which is on the outside of the stylus holder not with any pins." OK, I've stared at this paragraph and it makes no sense to me. The cartridge holder is what the cartridge body attaches to by way of scews and nuts. The cartridge needs to be set in an exact loaction in the holder for the proper alignment of the stylus to the record groove to occur. If you haven't used a stylus alignment guage on the cartridge, then you'll have other problems even if we get the hum issue resolved. Did you use the Dual alignment guage to install the cartridge? After you've set the alignment of the cartridge with a guage and tightened down the scews, you need to attach the cartridge pins to the cartridge holder's lead wires. These are the wires which run from the back of the holder (and terminate in pins extending out the rear of the 505's cartridge holder) and the color coded wires have clips which attach to the color coded pins on the cartridge body. If the colors on the cartridge holder do not match up to the colors on the cartridge body, let me know. It's important that you have the right leads going to the right pins on the cartridge. "I have the cartridge disconnected from the arm ... " Due to the Dual's cartridge holder, I don't know what this means. You have the cartridge disconnected from the from the cartridge holder? In other words, you've removed the cartridge from the holder and you have disconnected the lead wires of the cartridge holder from the cartridge pins? The cartridge is sitting on the table alongside you? And where is the cartridge holder? Installed in the headshell? Or is it also on the table? I need you to be clear on these matters, Shaun. Normally, I would know what your statement means but the Dual complicates the issue. From the start, without any cartridge holder installed in the headshell, you should have continuity between the tabs on the underside of the headshell and the hot (tip) and ground (sleeve) portions of the RCA's at the end of the lead cable which runs to your pre amp. I don't remember the order of tabs to hot and ground, but touching your probe to one pin, you should find you have continuity with either the tip or the sleeve of one of the RCA's. If you have that, check it as "OK" and move on to the next tab. It should have continuity with another portion of one of the RCA's. You need to first make certain the lead cable you installed has continuity with the headshell tabs. This is how we go about making sure you've done a good job of installing that cable. If the above information can't be verified, then you have to back up and find out why the lead isn't good from headshell through to each RCA. You also need to check the continuity of the cartridge holder's lead clips to its pins. Do a similar check between the cartridge holder's individual lead out pins and the individual cartridge wire clips. There must be a good connection from each clip to its corresponding pin on the cartridge holder itself. I've seen people screw up a repair on cartridge holders and there is no way to make the holder work afterwards. Verify each clip has continuity with one pin on the rear of the cartridge holder. " I am a bit of a newbie at this kind of thing" OK, then let's make sure we're on the same page with your test equipment. What are you using to check continuity? A VOM or a digital meter? A simple continuity tester with a light bulb? Just let me know you know how to use the tester you have. Otherwise, we're spinning our wheels when I don't get the sort of answers that make sense for my questions and instructions. Let's go through what you need to check in the order you need to check them. First, check just the cartridge holder for continuity. With the cartridge body sitting on the table along side you (removed from the cartridge holder), check for continuity between the cartridge clips and the pins on the back of the cartridge holder. Each clip should check with a corresponding pin. If they all check "OK", then you can check for continuity between the headshell tabs and the RCA's. If you have trouble accessing the headshell tabs with your test probe, install the cartridge holder into the headshel and check from the cartridge clips to the RCA's. There should be continuity between each individual point - do so for all of these points. One cartridge holder clip should have continuity with one portion of one RCA plug. If this isn't the case, then we need to find where the continuity is broken. Do you understand the cartridge holder installs into the Dual headshell by moving the cueing arm on the headshell back towards the rear of the table and then sliding the cartridge holder into the arm? The headshell and the cartridge holder have angled pieces towards their rear which fit together to ensure a proper fit of holder into headshell. Once the holder is properly installed in the headshell, you move the cueing arm back toward the front of the table to lock the holder into the headshell. All pieces of the cartridge holder and the headshell should fit flush. There should also be a very small screw which fits into the headshell from above and makes moving the cueing arm impossible. This is not a crucial part of the installation, it simply ensures you cannot screw up the cartridge installation by lifting the cueing arm. That the cartridge holder is properly installed and locked in place by moving the cueing arm to a right angle from the headshell is all that's vitally important. Make those checks to know you have continuity from each cartridge clip as it is installed in the headshell with one portion of each RCA plug and report back. Please answer all the questions I've asked or I won't have any ability to assist you further. When you've checked everything that could cause a hum and you still have a hum, I tend to think we're not checking the right things or we're not understanding the checks we're making. Help me out here, Shaun. . |
|
New member Username: ShaunwyattPost Number: 8 Registered: Dec-11 | Let's go through what you need to check in the order you need to check them. First, check just the cartridge holder for continuity. With the cartridge body sitting on the table along side you (removed from the cartridge holder), check for continuity between the cartridge clips and the pins on the back of the cartridge holder. Each clip should check with a corresponding pin. If they all check "OK", then you can check for continuity between the headshell tabs and the RCA's. If you have trouble accessing the headshell tabs with your test probe, install the cartridge holder into the headshel and check from the cartridge clips to the RCA's. There should be continuity between each individual point - do so for all of these points. One cartridge holder clip should have continuity with one portion of one RCA plug. If this isn't the case, then we need to find where the continuity is broken. I have checked all of these with a multimeter and they check out fine.The 4 pins where the stylus slides in do not check out with the rear of the cartridge Do you understand the cartridge holder installs into the Dual headshell by moving the cueing arm on the headshell back towards the rear of the table and then sliding the cartridge holder into the arm? The headshell and the cartridge holder have angled pieces towards their rear which fit together to ensure a proper fit of holder into headshell. Once the holder is properly installed in the headshell, you move the cueing arm back toward the front of the table to lock the holder into the headshell. All pieces of the cartridge holder and the headshell should fit flush. There should also be a very small screw which fits into the headshell from above and makes moving the cueing arm impossible. This is not a crucial part of the installation, it simply ensures you cannot screw up the cartridge installation by lifting the cueing arm. That the cartridge holder is properly installed and locked in place by moving the cueing arm to a right angle from the headshell is all that's vitally important. This is not my cartridge, mine is held on by a round nut at the back of the cartridge which you unscrew a pull off 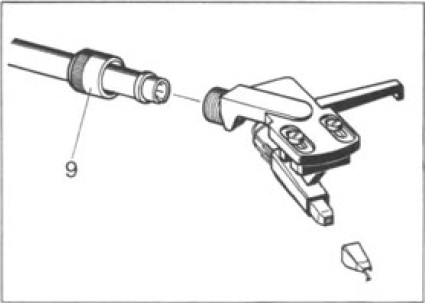 I have Rotel amp and a maplin preamp which i have tested with a dual 506 deck and it work ok |
|
New member Username: ShaunwyattPost Number: 9 Registered: Dec-11 | Sorry{The 4 pins where the stylus slides in do not check out with the rear of the cartridge} i was not looking closely enough inside the stylus holder i see it justs slides in, not onto pins |
|
Platinum Member Username: Jan_b_vigneDallas, TX Post Number: 16979 Registered: May-04 | . Oh, wow! OK, language needs to be clarified before further communication can take place. The stylus is the only part of the cartridge which makes contact with the record groove. It is the "needle". In budget line cartridges the stylus is bonded to the cantilever by way of a pipe which is punched through a hole in the end of the cantilever. It is very easy to break the stylus tip off the pipe. When this happens there is nothing which can make contact with the record groove walls and output from the cartridge is very low in level and garbled. The stylus attaches to the cantilever which is the thin tube exiting at a slight angle from the front of the cartridge body. The stylus and the cantilever are the two main parts of the stylus assembly. When you change the stylus on a cartridge, you are changing the stylus assembly. The stylus assembly will mount to the cartridge body. The cartridge body contains the magnets and poles which form the electric motor of the cartridge itself. The cantilever's movement within the magnetic field of the motor are what generate a voltage signal. The cartridge body is attached to the tonearm's headshell with screws and - sometimes - nuts. In the Dual headshell system, the cartridge body first attaches to a cartridge holder by way of screws and nuts. The cartridge holder has slots in its top side which allows the cartridge to be adjusted forward and aft in order to align the stylus postion a specifc distance away from the center of the tonearm's main bearing. This distance is called the "overhang" of the cartridge. The stylus is adjusted by way of an alignment guage which is specific to the Dual tonearm. If you do not use the correct alignment guage for your arm, the stylus will not properly track a disc and excessive record wear will result. Sound quality will be compromised if the stylus is not properly aligned. If you have not used a Dual alignment guage, we need to stop right now. The stylus must be properly aligned in the cartridge holder or nothing else matters. The cartridge holder has four color coded leads which exit from the rear of the holder. Each of these leads terminates at one end in a cartridge clip; a small copper/brass piece which slips over each cartridge pin. These four lead wires and clips correspond to the color coded cartridge pins which extend from the rear of the cartridge body. Each lead wire represents a "+" and a "-" output connection from the cartridge's motor. (A phono cartridge is a "balanced" circuit in that there is no "ground" comming from the cartridge itself, only "+" and "-" outputs.) The "+" and "-" pins of the cartridge should also be marked as such for each channel. These markings are on the rear of the cartridge body and correspond to each pin. On the top rear of the cartridge holder the leads attach to four pins which make the electrical connection to the headshell. The cartridge holder slides into the headshell by moving the cueing arm backwards and aligning the cartridge holder's parts with those of the headshell. Once the cartridge holder is fit flush to the headshell, the cueing arm is slid back into place; a 90 ° angle from the headshell. This allows the cartridge holder's pins to make contact with the four jacks (or tabs depending on model) at the rear of the headshell. The headshell has a short tube which extends from its rear which also has four pins inside the tube. The headshell is attached to the tonearm by sliding the tube into the tonearm. On top of the tube is a short headshell alignment pin which fits into a slot at the front of the tonearm pipe. After the headshell has been fitted to the tonearm finger tighten the capture nut on the end of the tonearm which will pull the headshell snug to the arm. This allows the four pins inside the headshell pipe to make contact with four jacks at the front of the tonearm. Once the capture nut has been tightened the headshell should be properly aligned on the tonearm and the headshell cannot rotate or move forward or back. However, aligning just the headshell does not mean the sylus has been properly aligned in the tonearm. Stylus alignment takes place before you place the cartridge holder in the headshell. Within the tonearm four wires run from the jacks at the front of the arm - which have been attached to the headshell pins - and these four color coded wires exit the arm at its base underneath the plinth of the table. The plinth is the main surface of the table upon which the platter and tonearm rest. On the Dual tables these wires are soldered underneath the plinth to a small board which also contains the ground wire for the arm. The solder joints are made to a phono interconnect lead cable which terminates in two RCA plugs and a black ground wire. These cables run from underneath the plinth through the base of the table. The RCA's must be conencted to an input which is labelled "phono" and which is connected to an active phono pre amp circuit. The black ground wire must be connected to a ground lug on the pre amp or to an unpainted chassis crew on the pre amp/receiver. . |
|
Platinum Member Username: Jan_b_vigneDallas, TX Post Number: 16980 Registered: May-04 | . Shaun, I need you to check for continuity at each point where the electrical connection between the cartridge clips and the RCA's can be broken. So, with the cartridge removed the the cartridge holder, check for continuity between the cartridge clips and the pins on the rear of the cartridge holder. Let me know if each clip does not have continuity with a corresponding pin or whether any two pins have continuity between them. Without the cartridge installed, each pin should not have continuity with another pin. If the cartridge holder checks out, install the holder into the headshell and lock the cartridge holder in place by moving the cueing arm forward. Now check for continuity between each cartridge clip and the four pins which exit at the rear and inside the headshell tube. If there is not a complete connection at each location, we need to find out what is wrong. Next, if everything checks OK so far, install the headshell in the tonearm and check for continuity between each of the four cartridge clips and the RCA plugs. Each cartridge clip should have continuity with either the tip or the sleeve of one of the RCA's. There should also be continuity between the black ground wire exiting the table and the tonearm pipe. This might be more dificult to check since the arm has been coated and you might not be able to make a good connection to the metal of the arm with your probe. None the less, at this point you should have established continuity between each cartdidge clip and each RCA. If this is not the case, try to determine where the lead is broken. If all clips have continuity with an RCA part, install the cartridge and plug in the table to the phono input. Connect the black ground wire from the table to a ground lug on the pre amp. You should have music without a hum. . |
|
Platinum Member Username: Jan_b_vigneDallas, TX Post Number: 16981 Registered: May-04 | . Do you have a Dual alignment guage? Which cartridge are you using? Is the stylus in place? You said the table had problems before it was given to you. What sort of problems? Did your friend try to repair the table? . |
|
New member Username: ShaunwyattPost Number: 10 Registered: Dec-11 | Thanks Jan I will try that I do not have a alignment gauge I cannot find anything on the cartridge numbers etc The stylus is not in place When my friend put it in storage it was ok |
|
Platinum Member Username: Jan_b_vigneDallas, TX Post Number: 16982 Registered: May-04 | . "This is not my cartridge, mine is held on by a round nut at the back of the cartridge which you unscrew a pull off " OK, I'm not sure exactly what that sentence means but I'm beginning to think you have a P-mount cartridge. The idea of a P-mount cartridge was to provide a constant mounting distanceand alignment for the stylus and a consistent weight for the arm balance. This would mean anyone could install any P-mount cartridge in any P-mount accessible arm and never have to make any adjustments. As with most things in consumer audio which strive for universality, P-mounts were quickly adapted to numerous brands of cartridge and table manufacturers and soon the universal nature of the P-mount succumbed to the whims of each designer. P-mounts had several types and one was a cartridge which had no 1/2" spacing for scews and nuts which would hold a conventional cartridge to a conventional headshell. This style of P-mount cartridge body was molded to a pipe at the rear which resembled the tube at the end of a conventional headshell. Looking at this photo; http://mintlp.com/best/sme%20tonearms.htm , the tube extending from the rear of the headshell is what I'm talking about. One style of P-mount cartridge molded the cartridge body to a piece of plastic which terminated in this tube with four short pins on the rear of the tube. This tube/cartridge was inserted into the front of the tonearm pipe and the capture nut on the amp tightened the P-mount to the arm. Is this the sort of cartridge you have? Or, does your cartridge have two wings/tabs on its top which provide mounting by way of screws and nuts to a plastic cartridge holder? The Dual plastic cartridge holder would look similar to this; http://www.ebay.com/itm/ws/eBayISAPI.dll?ViewItem%26item%3D250951903903 . |
|
Platinum Member Username: Jan_b_vigneDallas, TX Post Number: 16983 Registered: May-04 | . Well, crap! I can't get the link to the cartridge holder to work. Try this link; http://www.hvscareer.com/dual-turntable/ You may have to copy /paste the address into a search engine and go from there. Go about 1/2 way down the page and look at the "Vintage DUAL Turntable Headshell Clip 1219 1229 701 +" on the left side of the page. . |
|
Bronze Member Username: ShaunwyattPost Number: 11 Registered: Dec-11 | It is the original one fitted to the 505-2 i have posted a picture further up the page but i do not think you can see it http://www.williamthakker.eu/Dual-ULM-65-E-ULM65E-Headshell_p9169_x2.htm I downloaded the manual from vinyl engine there is a better picture on there |
|
Bronze Member Username: ShaunwyattPost Number: 12 Registered: Dec-11 | This my be better http://wega.we.funpic.de/505-2s/505-02.jpg |
|
Platinum Member Username: Jan_b_vigneDallas, TX Post Number: 16984 Registered: May-04 | . OK, If I understand the pictures correctly, you have no cartridge holder as shown in the photo I linked to. Your cartridge has a standard 1/2" mounting made through screws and nuts directly to the removable headshell . The headshell is then attached to the arm by way of the capture nut. Let me know if that's not correct. In the last few years of Dual they changed the way their cartridge mounting system was made and there are several styles of headshells for the various models. The style you have minimizes the number of breaks in the cartridge mounting system and should make for fewer places where the ground issue could cause noise. If you have a removable headshell without a cartridge holder, you need to check for continuity from the cartridge clips to the four pins on the back of the headshell. Then install the headshell - without a cartridge - into the arm and tighten down the capture nut finger tight. Then check from the cartridge clips to the RCA's. Check the black ground wire for continuity to the arm by touching your probe to bare wire (or a lug) on the end of the ground wire and to the inside of the tonearm where the headshell mounts. If you do not have continuity from the clips to the RCA's and if you can remove the plinth from the turntable base, check from the cartidge clips to the solder joints under the plinth and then from the solder joints to the RCA's and also check the ground wire for continuity from the solder joint or the base of the arm. We still need to deal with cartridge alignment. You shouldn't just put the cartridge in the headshell and play a disc. If the stylus is not positioned accurately, you'll have excessive distortion and mistracking along with high record wear. You'll have to find an alignment guage somewhere on line. You might try the Dual website I listed in an earlier post and check under the parts suppliers. Each Dual headshell had a specific alignment guage and you'll have to have the correct gauge for your table. If you have continuity throughout the arm from the clips to the RCA's and the ground wire to the arm, you shouldn't have any hum. Let's hope for the best. I've never seen a cartridge go bad to the point it created a hum. It's pretty close to impossible for this to occur since the cartridge doesn't typically have a ground, just "+" and "-" outputs. Hum in a table is almost always caused by a broken lead or the lack of a suitable ground wire or connection point. Touching the table's ground wire to a screw which is holding a foot onto the pre amp is typically a good ground point if nothing else works. You say you put a new stylus on the cartridge. What stylus did you order if you don't know the cartridge model? . |
|
Bronze Member Username: ShaunwyattPost Number: 13 Registered: Dec-11 | Thanks Jan I will go through everything in the next couple of days I Googled stylus for a Dual 505-2 and bought it in the UK from the Stylus Lady, it is made by Concorde. |
|
Bronze Member Username: ShaunwyattPost Number: 14 Registered: Dec-11 | Hi again I have gone through this many times just to make sure and i had my son confirm what i was doing.I have continuity from the clips to the RCA'S and the ground wire to the arm.The hum gets louder when i touch the arm.The music seems louder than before but the hum is still there. Should it still hum with the cartridge unscrewed and removed? When i play a record and disconnect the RCA'S from the amp should the + on the two RCA'S have continuity through the multimeter.The - has continuity with this test |
|
Platinum Member Username: Jan_b_vigneDallas, TX Post Number: 16993 Registered: May-04 | . That's not what I wanted you to say, Shaun. I was hoping you would find a connection point that might be broken or oxidized to the point a simple cleaning would take care of the problem. Touching the arm can often result in a louder hum as your body is simply becoming another ground plane. It's very likely the table will still have a hum even when the cartridge is removed since the ground issue tends to be in the arm and typically not in the cartridge. Most cartridges have a common connection in the coils which represent the "-" pin. So its very common to have continuity between the various pins of the cartridge itself. Measure the cartridge at the pins with the clips detached from the cartridge and the results are likely to match what you find at the RCA's with the clips installed. Try this; with the catridge installed in the arm, lock down the arm and let's try to find a better grounding point for the arm itself. Remove the plinth from the base and prop the plinth up on a few books to provide access to the underneath of the table. Detach the table's ground wire from your pre amp. Attach a new wire to the ground lug on your pre amp and then try to find a location on the underside of the table or the base of the arm which removes the hum. If you can find such a location, make your cable attachment to this point. Keep the volume level down to a minimum as you try various locations. If you have no luck under the plinth, you can try touching the wire to one of the "-" terminals of the cartridge. If this doesn't solve the problem, Shaun, I'm pretty much out of answers. At that point I would contact a technician who is familiar with the Dual tables. You could try a different cartridge but, as I've said, cartridges are not typically the cause of the problem here. There are a few cartridges which have a grounding strap attached to the cartridge body and this strap in some cases needs to be removed to minimize hum. I suppose your cartridge might need this strap and none is available. A new cartridge might solve the problem but I would make that my last ditch effort before I turned the table over to a tech. leo asked about possible damage to the cartridge when you were installing the stylus assembly. That too is all but impossible. But since you don't know exactly which cartridge you have, I suppose it makes sense to ask whether the hum is present when you install the cartridge in the arm but without the new stylus assembly in place. Good luck. . |
|
Bronze Member Username: ShaunwyattPost Number: 15 Registered: Dec-11 | When you say detach ground wire from preamp mine has no earth connection it is connected directly to the amp |
|
Platinum Member Username: Jan_b_vigneDallas, TX Post Number: 16994 Registered: May-04 | . "When you say detach ground wire from preamp mine has no earth connection it is connected directly to the amp" The ground cable which runs from the underside of the turntable should be attached to either a ground lug on the (phono) pre amp or to an unpainted screw on the pre amp - normally screws which attach the feet to a pre amp will be unpainted. Attaching the ground wire directly to the power amplifier will result in hum from the turntable. Any pre amp which includes an active phono stage should have an unpainted ground lug on its backplate near the inputs for the phono leads. . |
|
Bronze Member Username: ShaunwyattPost Number: 16 Registered: Dec-11 | This is my preamp http://www.maplin.co.uk/stereo-phono-pre-amplifier-28732 A reviewer said he needed to screw the earth lead to it but the only place i can see is in the casing |
|
Bronze Member Username: ShaunwyattPost Number: 17 Registered: Dec-11 | Earthing the preamp makes no more difference than straight to the main amp I have moved the earth on the turntable around and tried it on the contact plate Try this; with the catridge installed in the arm, lock down the arm and let's try to find a better grounding point for the arm itself. Remove the plinth from the base and prop the plinth up on a few books to provide access to the underneath of the table. Detach the table's ground wire from your pre amp. Attach a new wire to the ground lug on your pre amp and then try to find a location on the underside of the table or the base of the arm which removes the hum. If you can find such a location, make your cable attachment to this point. Keep the volume level down to a minimum as you try various locations. If you have no luck under the plinth, you can try touching the wire to one of the "-" terminals of the cartridge. If i take a earth from the preamp to the red wire on the back of the cartridge the hum stops,but if i do the same from the main amp a very strange buzzing occurs |
|
Platinum Member Username: Jan_b_vigneDallas, TX Post Number: 16995 Registered: May-04 | . Sine we don't know the brand or model of cartridge, it's not easy to tell what the red terminal represents. But, normally, the channel's + and - are divided as follows; red/right +, green/right -, white/left + and any remaining color is left -. However, these aren't consistent amongst cartridge manufacturers and white could just as easily be right -. The -'s of most cartridges are common to each channel. Using your meter you can determine which two terminals have continuity between them. Use those pins as your -'s for each channel and simply assign one of the other pins as right and left channel +. If you swap channels at the cartridge pins, you can always redo them or simply swap your RCA's at the pre amp channel for channel. If the hum stops and you still have music with a ground attached to the red terminal of the cartridge, then I would make a jerry rigged connection to that pin or cartridge clip and head on down the road with your table. Any wire will work for ground. An extremely thin 24 guage wire will do. Lightly attach it to the arm so you don't add too much mass to the arm system and run it to the pre amp. If you have a Radio Shack in your area, they probably still sell a package of hook up wire with three guages of wire in the pack. One of those should be about 22 guage. The wires have an enamel coating on them. Take a razor blade or knife and remove a small amount of the enamel to about 3/8" back and then make your connections with the bare wire. Becareful not to let the wire touch ny other terminal. Or make the connection to the solder joint corresponding to the red terminal's lead under the table's plinth. We'll hope that works. . |
|
Bronze Member Username: ShaunwyattPost Number: 18 Registered: Dec-11 | Ok Thanks Jan Hope this works as i am going to throw the thing in the trash after this But thanks for all your help and lots of patients I have learnt so much about turntables and there workings from you Thanks again Shaun |
|
Bronze Member Username: ShaunwyattPost Number: 19 Registered: Dec-11 | I know this is a piece of crap but is it worth buying to find out if the cartridge is at fault and then replace afterwards, it looks like it will fit http://cgi.ebay.co.uk/ws/eBayISAPI.dll?ViewItem%26item%3D160699409091&fromMakeTr ack=true&ssPageName=VIP:watchlink:top:en#ht_919wt_1037 |
|
Bronze Member Username: ShaunwyattPost Number: 20 Registered: Dec-11 | Sorry try this http://www.audiomate.co.uk/proddetail.php?prod=G050ZM |
|
Platinum Member Username: Jan_b_vigneDallas, TX Post Number: 16997 Registered: May-04 | . I wouldn't bother with that cartridge, Shaun. You don't need the headshell and there's no guarantee it would properly fit and align with the Dual arm.. There's no reason not to buy a new cartridge since whatever you have in the headshell now probably has a few years (decades) life on it. Cartridge bodies don't wear out, just the stylus. But after a while a cartridge can be discarded and replaced with something fresh just for the sake of having a new sound. Try the Audio Technica; http://www.needledoctor.com/Audio-Technica-95E-Cartridge?sc=2&category=402 Or the Ortofon; http://www.needledoctor.com/Ortofon-OM-5E-Phono-Cartridge?sc=2&category=402 They're both decent cartridges for the money and will fit the Dual arm. But you still need to find a cartridge alignment gauge for the Dual. With the headshell you have, you could buy one of these; http://www.needledoctor.com/Ortofon-Cartridge-Alignment-Gauge?sc=2&category=422 I wouldn't throw the Dual in the trash. They were generally regarded as the least expensive good turntable you could buy. I would just find someone who could look at the table and make the needed repairs. In person troubleshooting goes far more smooothly than it does over a forum. Once the problems are sorted out the Dual should give you another few decades of good sound. I still use a vintage Dual 1009 for my 78's. That table's pushing forty years old. . |
|
Bronze Member Username: ShaunwyattPost Number: 21 Registered: Dec-11 | I tried the cheap cartridge and it works fine so i will now put it all back together and buy the Ortofon OM 5E you recommended along with the alignment gauge.Even with the cheap cartridge it has a very impressive sound even on my old vinyl Thanks Jan for all your help |
|
Platinum Member Username: Jan_b_vigneDallas, TX Post Number: 17013 Registered: May-04 | . OK, I'll make a note that I've now seen a cartridge cause a hum. Glad it's all working well. As your LP collection grows, consider this; http://www.musicdirect.com/p-731-spin-clean-starter-kit-record-washer-system-mk2 .aspx A clean record sounds quite a bit better than a dirty one - and until you clean it, they are all dirty. . |
|
Bronze Member Username: ShaunwyattPost Number: 22 Registered: Dec-11 | Thanks Jan It is my son who is just getting in to vinyl i have been digging some on mine out of the garage for him.The washer system looks a great idea,i remeber using a piece velvet |
|
Platinum Member Username: Jan_b_vigneDallas, TX Post Number: 17015 Registered: May-04 | . Forget the velvet now, Shaun, it only increases static electricity which will attract even more small/micro dust particles to the record surface. This will create more ticks and pops. Just to begin with, a more modern microfibre towel is best. If nothing else, take the disc to the sink and do a very mild wash with diluted detergent which has no dyes or frangrances. I use All Clear laundry detergent at about one or two drops to two cups of water. All you need is enough detergent to act as a surfactant which will release the water's surface tension allowing it to flow into the groove rather than sit on top of the groove. Too much detergent and you'll never get it out of the groove, so less is more here. Using warm water and a microfibre towel wash the disc surface with movements in the direction of the groove. Rinse well while keeping excess water off the label. Repeat on the opposite side and then lay the disc on a folded terry cloth towel. Dry with another microfibre towel until completely dry. If you're doing a stack of discs, you'll need a stack of microfibre towels as they absorb great amounts of water. Allow the disc to air dry for a few moments before you either play the disc or replace it in its sleeve. Another microfibre towel which has been dampened and then squeezed out as dry as possible will suffice as a good cleaner before each pay. Don't overwork the last cleaning step before play or you'll still build up static electricity, particularly in the dry environment of a home in winter. If you check the archives of this forum, you'll find a thread on DIY record cleaning. Take care, Shaun, enjoy your discs with your son. And have a good holiday season. Come back with any other questions which arise. . |
|
Bronze Member Username: ShaunwyattPost Number: 23 Registered: Dec-11 | Great tip thanks Happy holiday season to you |
Main Forums
Today's Posts- Home Audio Forum
- A/V Receivers Forum
- Amps Forum
- Cassette Forum
- CD Players Forum
- CD Recorders Forum
- DAC & Transports Forum
- DVD-Audio & SACD Forum
- Equalizers Forum
- Integrated Amps Forum
- iPod Docks Forum
- MiniDisc Forum
- Mini Systems Forum
- Digital Music Systems Forum
- Phono Forum
- Preamps Forum
- Speakers Forum
- Subwoofers Forum
- Tuners Forum
- Home Video Forum
- Home Theater Forum
- Car Audio Forum
- Accessories Forum
- All Forum Topics